DICOM 3D Viewer
Displaying volume data
Since Weasis Version4.1.0 the 3D viewer allows displaying volumetric renderings with different options for adjusting the pseudo colors, the transparency, the shadows and the lighting according to the type of exam.
The volume rendering uses a ray casting algorithm and the OpenGL Shading Language (GLSL). Shader programming is used to create the necessary algorithms and data structures required for the ray casting computations to be executed efficiently on the graphics card. Therefore, minimal graphic resources are required.
Requirements
Some requirements related to the specifications of your graphic card are mandatory. They can be displayed in “OpenGL Support” from the menu “File > Preferences > Viewer > 3D Viewer”:
- Driver version: The OpenGL version must be at least 4.3 to support the Compute Shader (not supported currently on macOS)
- Max 3D texture dimension length: The limit of any dimension (X,Y,Z) of the volume data
- If you have other information in red, it means that the configuration is not optimal but in most cases can work (see how to limit the size of 3D textures)
If the graphic card displayed in Weasis is not the right one, you must solve this problem on the side of the graphic drivers or the operating system.
OpenGL does not include specific functionality for selecting a particular graphics card. Instead, this is handled by the graphics card driver and operating system, which provide a way for users to configure which graphics card should be used by an application.
Open the 3D viewer
The 3D view can be opened with in the toolbar or by right-clicking on the thumbnail in the DICOM explorer.
Try to load a volume dataset (Medical Demos from data.kitware.com) Launch
Toolbar A
Actions in the toolbar are:
- Allows you to fully reload the volume
- The orthographic projection maintains parallel lines unlike the perspective projection that provides a perception of depth. The default mode is the perspective projection.
- Opens the 3D preferences
For other buttons see below.
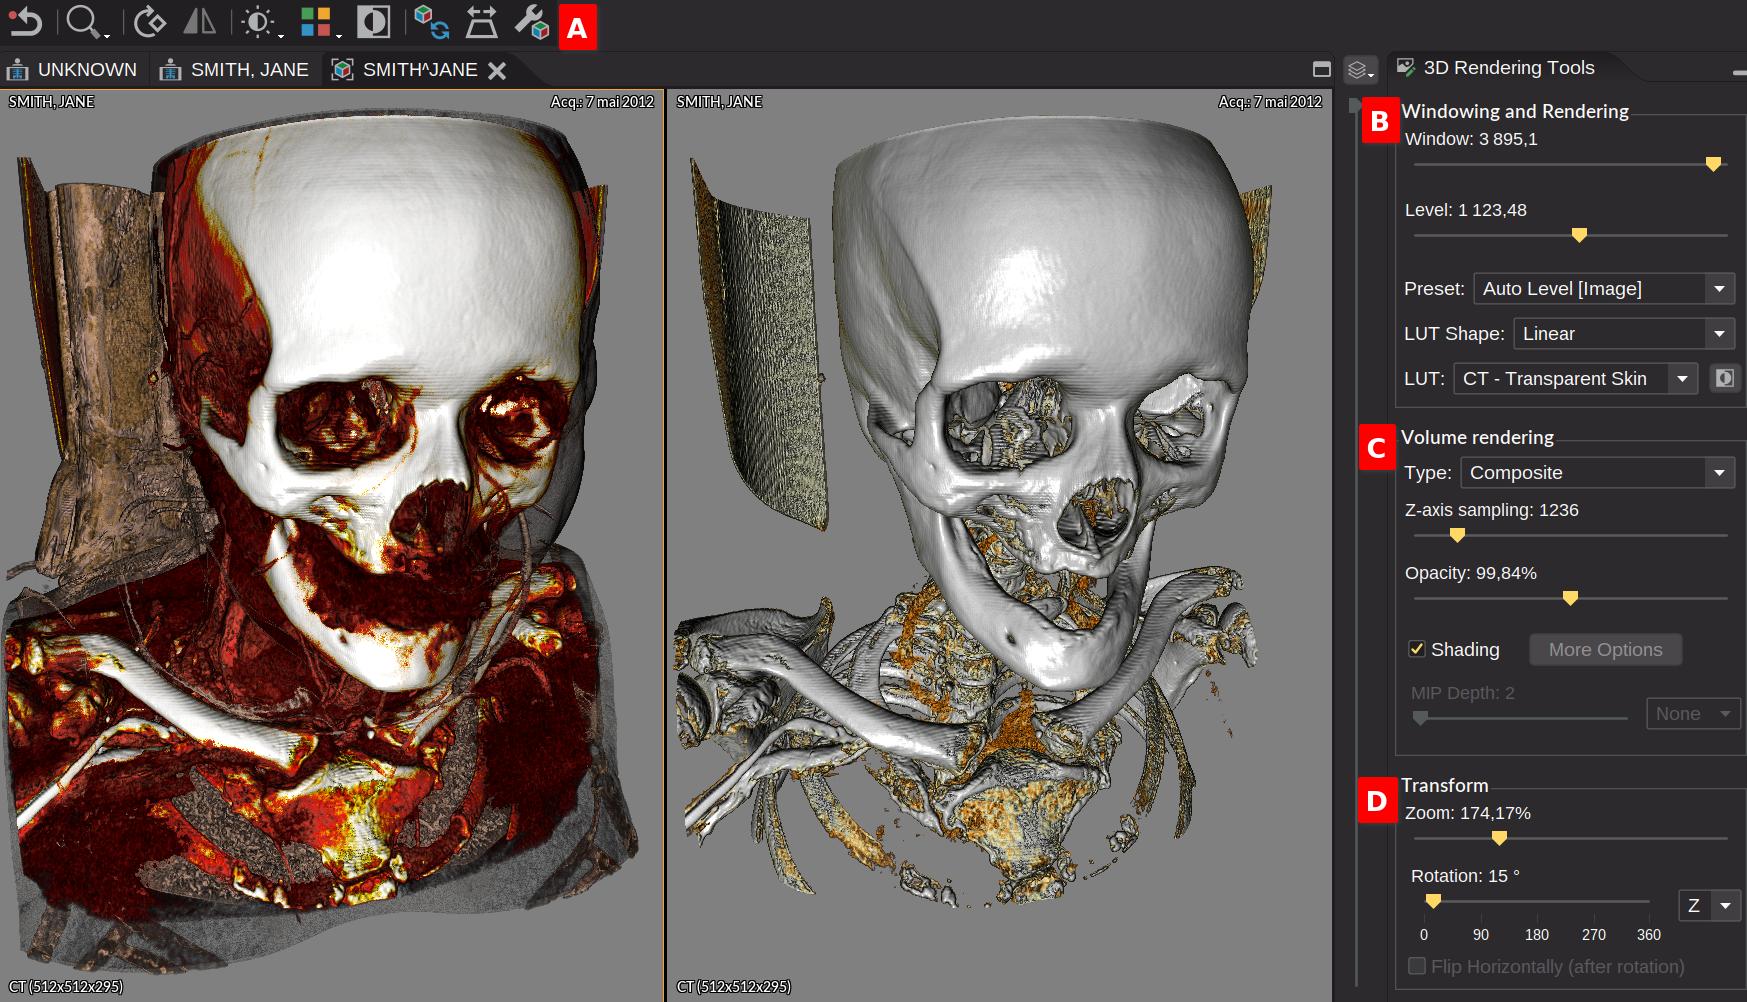
3D Rendering Tools
This tab contains all the tools to modify the volume rendering. If you want to return to the original settings, just click on the toolbar button or from the context menu.
Windowing and Rendering B
Some of the options described below are also available in the toolbar and in the contextual menus.
- Window: The width of a range of voxels values mapped to a specific range of display values.
- Level: The center of the range defined by Window.
- Preset: Specific values of Window and level. Auto Level [Image] is the default value when changing a LUT and provides the best visual appearance of a Volume LUT.
- LUT Shape: The mapping (transfer function) between the input values and the display values can be linear, sigmoid and logarithmic. Default value is linear.
- LUT (Volume LUT): A Volume Lookup Table (LUT) is a 3D LUT used to map the grayscale values of a volume dataset to color, opacity and lighting values for visualization. Choosing a LUT from the toolbar or the contextual menu is easier because the LUTs are displayed in an order according to the modality and with a preview.
- allows you to invert the LUT.
Volume Rendering C
This panel contains options for the rendering type and its quality, transparency, lighting, and shading settings.
- Type: Composite is the classic type of volume rendering. The Maximum Intensity Projection (MIP) is the highest intensity voxels (3D pixels) along a ray path are projected onto a 2D plane. Iso surface is a technique to create a 3D representation on a specific intensity threshold.
- Z-axis sampling: The sampling should be large enough to accurately capture the details of the volume data, but small enough to avoid excessive computation time. The default value is calculated according to the size of the volume.
- Opacity: The opacity factor of the voxels. Can be set to more than 100% to modify initial values (lower than 100%) transmitted by the Volume LUTs.
- Shading: Allows to activate the shading. Default value is defined in LUT. The additional options allow you to override the default lighting settings (comes from Volume LUT).
Transform D
Allows you to zoom and rotate along a specific axis
Preferences
From the menu “File > Preferences > Viewer > 3D Viewer”:
OpenGL Support
Information about the graphics card and OpenGL capabilities, see Requirements.
3D Viewer
- Default layout: The preferred layout used when opening the 3D viewer
- Max 3D texture size: The maximum size of the volume according to X/Y (width and height of images) and according to Z (number of images in the stack composing the volume)
The maximum values of the default 3D textures come from the graphics card. However, it may be wise to decrease these values (e.g. 512) in order to allow a more efficient display of volumetric renderings for which the hardware resources are not sufficient.
Volume Rendering
- Dynamic quality: Allows you to make the render more fluid by reducing its quality (according to the z-axis) when it is rotating or being modified. When the slider is at maximum then there is no more quality reduction.
- Default orientation: The preferred orientation used when opening a volume rendering view. Default is Anterior position by turning 15 degrees to the right and 15 degrees downwards.
- Background color: Defines the background color of the rendering
- Light color: Defines the color of the light during the illumination of the rendering
Video tutorials
- Display an MR scan with an angiography-specific protocol by creating a volume rendering. Then either use the MIP type or choose a 3D LUT and adjust the win/level values.