DICOM Export
How to export DICOM files
Exporting the selected view
From the toolbar icon or from the main menu File > Export > Exporting view export the selected view either to the clipboard or to image file (PNG, TIF, JPG, JPEG2000).
Current view
Export the view as it is (size and overlay).
Anonymize: It allows you to remove identifying information in overlay.
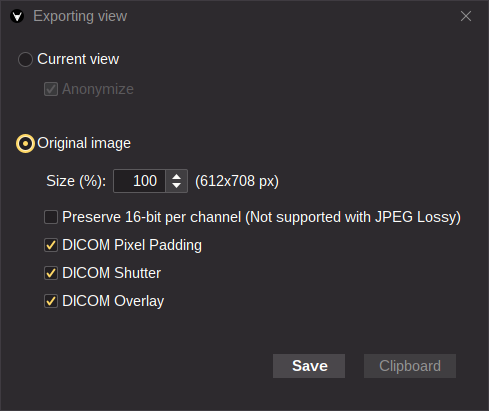
Original Image
Export the view according to the original image with some options.
- Size: Change the image size in percent
- Preserve 16-bit per channel: Option to preserve the pixel depth (e.g., 16-bit in PNG/JPEG 2000/JPEG-XL/TIFF, double values in TIFF). When this option is applied, the pixel values will match with the Modality LUT values (e.g., Hounsfield values). Exporting in JPEG Lossy is only possible when unchecked for an 8-bit image.
- DICOM Pixel Padding: Apply the DICOM pixel padding when checked
- DICOM Shutter: Apply the DICOM shutters when checked
- DICOM Overlay: Apply the DICOM overlays when checked
DICOM Export
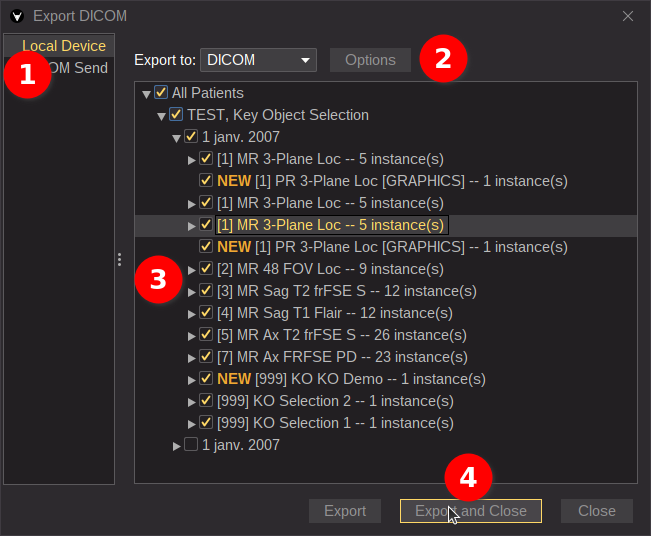
In order to open the DICOM export window click on toolbar icon or from the main menu File > Export > DICOM
Local Device
- Select Local Device item
- Choose the exporting options


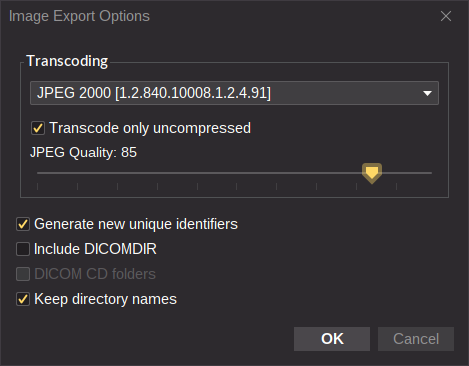
- Transcoding: It allows you to change the DICOM transfer syntax. Use this option only if you understand well what you are doing.
- Generate new unique identifiers: Create new UIDs for some attributes. Within an export, the consistency between all the UIDs and their references is preserved.
- Include DICOMDIR: Create DICOMDIR file
- DICOM CD folders: Add a directory to be compliant with DICOM CD
- Keep directory names: Preserve the name in the directory hierarchy (not compliant with DICOMDIR)
- Select the patient/study/series/instance to export. Note: series created by Weasis have a flag “NEW”
- Export the selection and close the Window
Tip
When opening the Export DICOM window, the checkbox of the study selected in the viewer (surrounded by an orange line) is automatically checked, and open series have a full-line selection.
In order to help with series selection, place the cursor on a series line, and you’ll see a tooltip displaying its thumbnail.
Note
When DICOM data is exported in a native image format (JPG, PNG, JPEG 2000, JPEG-XL or TIFF), only the images are transformed (see original image options), and the encapsulated files (video, audio and PDF) are extracted.
Multiframe images are exported by adding a number to the end of the file name.
DICOM Send
- Select DICOM Send item
- Select the destination node (either a DICOM node or a DICOMWeb node)
- Select the patient/study/series/instance to export. Note: series created by Weasis have a flag “NEW”
- Send the selection to the destination and close the Window
CD/DVD Image
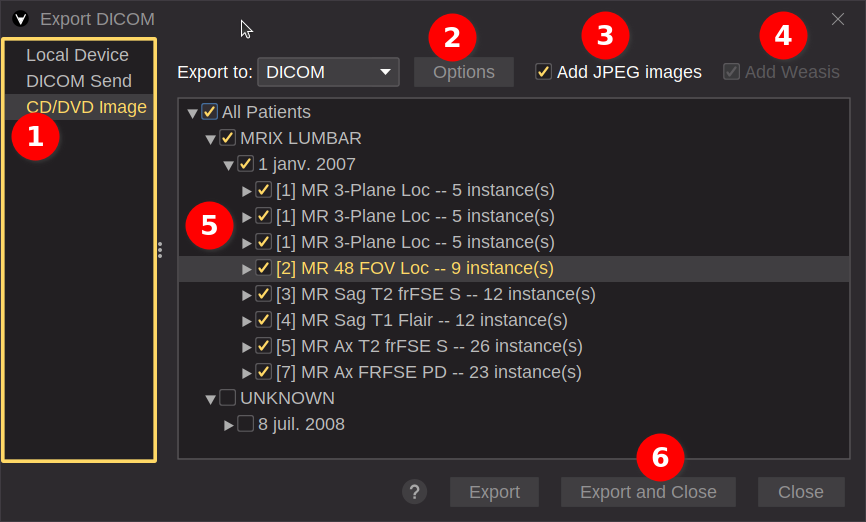
- Select the CD/DVD Image item
- Choose the exporting options
- Transcoding: It allows you to change the DICOM transfer syntax. Use this option only if you understand well what you are doing.
- Generate new unique identifiers: Create new UIDs for some attributes. For an export, the consistency between UIDs and their references is preserved.
- Add JPEG images allows extracting the images and the encapsulated files (video, audio and PDF) into a JPEG folder
- Add Weasis allows embedding the viewer into the iso image. This option is only possible on Windows x86-64 (for exporting and running). Running the viewer directly on a CD/DVD ca be quite slow. To avoid that, you can install the ISO on a USB stick or read the CD with a locally installed viewer as described in README.html.
- Select the patient/study/series/instance to export
- Export the selection and close the Window


