DICOMweb Configuration
How to configure a DICOMweb node
DICOMweb is the modern, HTTP-based set of DICOM services (QIDO-RS for query, WADO-RS for retrieve, STOW-RS for store, plus the legacy WADO-URI). Once a DICOMweb node is configured in Weasis, it shows up in the DICOM Query/Retrieve dialog and behaves like any other archive.
This page covers manual configuration inside Weasis. If you embed Weasis in a web portal, you can also launch it from a web context so that the DICOMweb parameters are derived automatically from the launch URL — no per-user configuration required.
General Configuration Steps
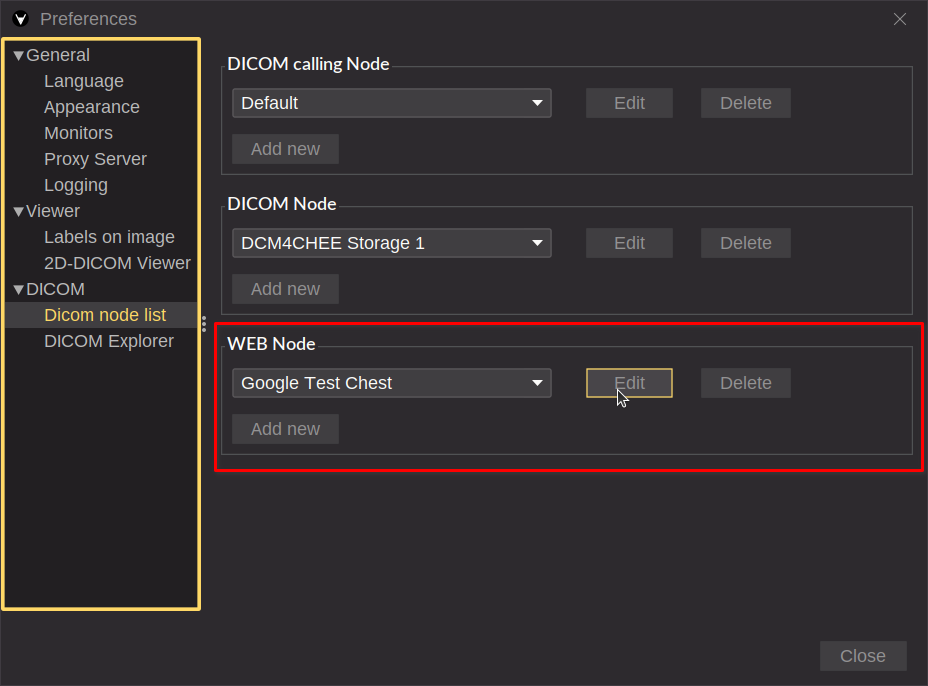
- Open File > Preferences (Alt + P).
- Select DICOM node list in the left sidebar.
- Click Add new to create a new node, or select an existing one and click Edit.
In the node dialog:
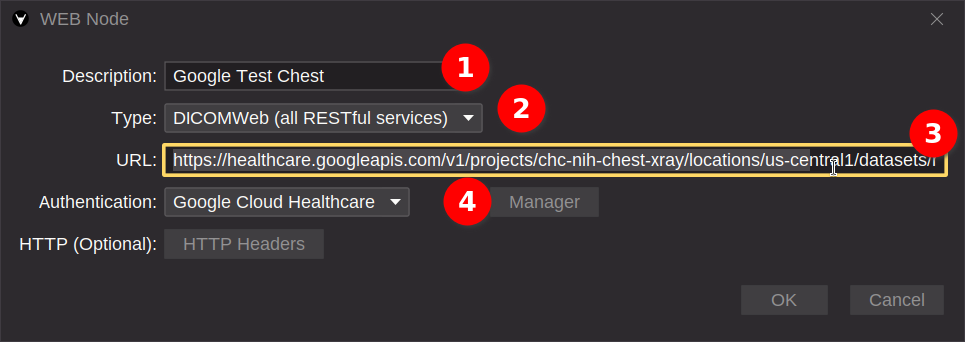
- Give the node a descriptive name.
- Pick a service type. The default
DICOMweb (all RESTful services)covers query, retrieve, and store at once. To restrict the node to a specific service, pick one of:- QIDO-RS — query.
- STOW-RS — store.
- WADO-URI (non-RS) — legacy single-object retrieval. Combines a classic C-FIND query with a WADO-URI retrieve (see Query/Retrieve).
- WADO-RS (Retrieve) — modern retrieve.
- Enter the service URL of the DICOMweb server.
- Configure authentication by clicking Manager, then Add:
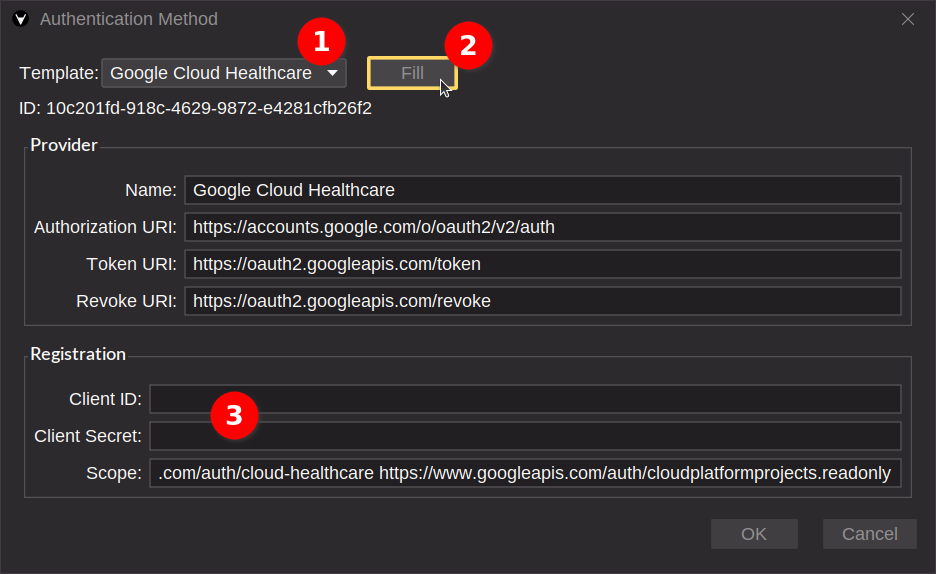
- Either pick a template from the list and click Fill to populate some fields, or fill them in manually.
- In the Provider panel, every field is mandatory.
- In the Registration panel, every field is optional — except for OAuth2, where the Client ID, Client Secret, and Scope must be filled. Audience is optional, but some providers need it.
- The Grant Type selector chooses the OAuth2 flow:
code(Authorization Code, the default) — interactive login: Weasis opens your browser so you sign in with your account, then receives the token through a loopback redirect. Use this for user-facing access.client_credentials(Client Credentials, RFC 6749 §4.4) — non-interactive, server-to-server: Weasis obtains the token directly from the token endpoint using only the Client ID and Client Secret, with no browser login. Use this for service/headless accounts.
- Click OK to save the authentication.
- Optionally, add HTTP headers that should be sent with every request to this service URL (useful for tokens or other custom auth schemes).
- Click OK to save the node.
Then open the DICOM Import dialog and pick the new node. If OAuth2 is configured with the Authorization Code grant, the first query opens your browser to complete the sign-in; subsequent queries reuse the cached token. With the Client Credentials grant, no browser login is required — Weasis authenticates silently using the configured Client ID and Secret.
Supported DICOMweb Providers (non-exhaustive list)
Google Cloud Healthcare API
Google Cloud provides a comprehensive DICOMweb implementation through the Healthcare API.
Configuration (see also the general steps above):
- Create a new DICOMweb node with a descriptive name.
- Pick DICOMweb (all RESTful services).
- Enter the Google repository URL (must end with
/dicomWeb). - Configure authentication by clicking Manager, then Add:
- Pick the Google Cloud Healthcare template.
- Click Fill.
- Enter your Client ID and Client Secret.
- Click OK to save the authentication.
- Optionally, add HTTP headers for the Google API.
- Click OK to save the node.
Note
The DICOMweb thumbnail service is not currently supported by the Google API, so series thumbnails will not preview before the full retrieve.
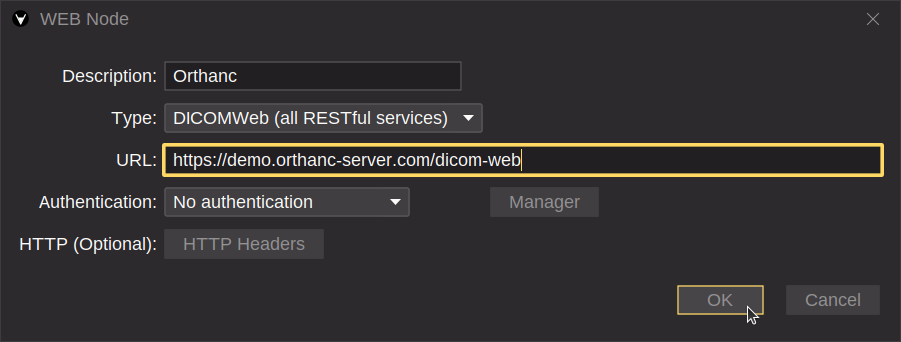
Orthanc WEB Server
Orthanc is a lightweight DICOM server with DICOMweb capabilities.
The screenshot below is configured for the public demo server, which requires no authentication. For your own Orthanc instance, replace the URL and configure the authentication method as described in the general steps.
Note
The DICOMweb implementation in Orthanc does not currently support the thumbnail service, so series thumbnails will not preview before the full retrieve.
dcm4chee-arc-light
dcm4chee-arc-light is a robust open-source PACS that exposes DICOMweb services out of the box.
To configure a dcm4chee-arc-light node (see also the general steps):
- Add a new DICOMweb node.
- Enter a description (e.g.
DCM4CHEE Archive). - Pick the DICOMweb service.
- Enter the URL of your dcm4chee-arc-light server. The default endpoint follows this pattern:
If the dcm4chee-arc-light server requires authentication, configure it on both sides:
In Weasis
- Click Manager, then Add to create a new authentication.
- Pick the Default Keycloak template and fill in:
- Name —
dcm4chee-arc-light - Base URL —
https://[server-address]:8843 - Realm —
dcm4che - Client ID —
weasis - Client Secret — the secret you copy from Keycloak (see below).
- Scope —
openid - Audience — leave empty.
- Name —
In Keycloak — register the Weasis client for DICOMweb access:
- Sign in to the Keycloak Admin Console (typically
https://[server-address]:8843/admin/dcm4che/consolefor the secure URL). - In the left menu, click Clients > Create.
- General settings:
- Client Type —
OpenID Connect - Client ID —
weasis
- Client Type —
- Capability config:
- Client authentication — ON
- Standard flow — ON
- Direct access grants — ON
- Login settings:
- Root URL — leave empty.
- Valid Redirect URIs — add
http://127.0.0.1*. - Web Origins — add
+to allow any origin that matches a Valid Redirect URI. - Click Save.
- Copy the Client Secret from the Credentials tab and paste it into the Weasis authentication form above.
Amazon HealthLake
Amazon HealthLake is a fully managed service for storing, transforming, querying, and analyzing healthcare data at scale.
Imaging data is exposed through the AHI DICOMweb Proxy. To consume it from Weasis, create a DICOMweb node with this URL:
The complete Weasis configuration is documented at the end of the AHI DICOMweb Proxy README.