Dicomizer
How to convert images into DICOM files
The Dicomizer converts standard files — photos, scanned reports, videos, 3D models — into DICOM objects so they can be archived in a PACS alongside acquisitions from imaging modalities. Typical use cases include adding dermatology or wound-care photos to a study, attaching a PDF report or consent form, archiving endoscopic or surgical videos, and packaging STL files used for 3D printing.
Beyond the file conversion itself, the Dicomizer also helps you set the DICOM tags at the patient, study, and image levels so the resulting objects are consistent, searchable in the archive, and recognized by every DICOM viewer.
The sections below describe the day-to-day use of the Dicomizer. Administrators deploying the tool in a clinical workflow should also read Integrating the Dicomizer at the end of this page.
How to Launch Dicomizer
When Weasis is installed, the Dicomizer is also available as a standalone application with this shortcut (Windows and Linux only).
On macOS, run the Dicomizer command from the terminal:
If you use the Dicomizer frequently on macOS, use Automator to create a Dicomizer.app with a Run Shell Script action containing the command above.
Import Media Files
The Dicomizer can encapsulate the following file types into DICOM objects:
- Standard images — TIFF, BMP, GIF, JPEG, PNG, RAS, HDR, PNM. Converted to JPEG lossy to comply with the DICOM standard.
- PDF documents (
application/pdf) Version4.6.2 — convenient for archiving reports, forms, or scanned documents. - STL files (
model/stl) Version4.6.2 — for 3D printing and surgical planning. - MPEG-2 video (
video/mpeg) Version4.6.2 — for compatibility with legacy medical imaging systems. - MPEG-4 video (
video/mp4) Version4.6.2 — modern format for endoscopy, ultrasound, surgical recordings, and other high-quality medical videos.
Warning
Only MPEG-4 videos that are compatible with the DICOM standard are accepted — namely MPEG-4 AVC/H.264 High Profile (up to Level 4.2) or HEVC/H.265 Main and Main 10 Profile. Videos using a different profile are rejected with a message asking you to convert them to a compatible format first.
Video files are also size-limited since Version4.7.0: a file larger than weasis.acquire.video.max.size (1024 MB by default — see the preferences) is rejected. Set the preference to 0 to remove the limit.
Importing files
- In the left panel, navigate through the file system to locate the files to convert. The button next to the combo box on the right opens a folder chooser to pick the directory containing the eligible media.
- To organize files into separate series, select the thumbnails in the left panel and click Import. The dialog offers three grouping options:
- Do not group — all images are imported into a single series (same as drag-and-drop).
- Group by date — images are split into series based on their acquisition date. A second field controls the maximum time gap that still keeps two images in the same series.
- Group by name — all images are imported into a single series with a custom name.
- Alternatively, drag and drop files from the system file explorer into the central panel. The files are either added to the current series, or assigned to a default series based on their media type.
Note
For image formats that carry EXIF tags, the following values are mapped to DICOM tags automatically:
- Image Orientation → adjusts the image orientation.
- Image Description → mapped to Image Comments.
- Manufacturer Description → mapped to Manufacturer.
- Camera Model Description → mapped to Manufacturer Model Name.
- Date/Time (Original) or, if absent, Date/Time → mapped to ContentDate and ContentTime. If both are absent or invalid (date > now + 1 day, or date < now − 30 years), the file’s last-modified date is used.
Note
Series-grouping buttons cannot be deleted directly. Remove every thumbnail associated with the button first, and the button disappears.
Tip
The combo box keeps the list of recently used folders. Connecting a USB device automatically adds the device path to the list.
Edit DICOM Tags
The Album panel manages DICOM tags at the patient, study, series, and image levels:
- The left panel lists the groups, each representing a DICOM series.
- The central panel shows the thumbnails of the imported media. Select one or more thumbnails to edit their DICOM tags; double-click a thumbnail to open the image in the Photo Editor.
- The bottom panel displays the DICOM tags of the selected images. Image-level tags are only visible when a single image is selected.
Tags in the bottom panel are organized into a categorized tree:
- Global tags — applied to the patient and study levels.
- Series level — applied to the series level.
- Image level — applied to the individual image level.
Note
A red dashed outline around an item means the value is mandatory and must be filled in before publication.
Warning
Person-name fields (PatientName, OperatorsName, …) must follow the Last^First^Middle^Prefix^Suffix format defined by the DICOM standard. This rule applies both to values typed by hand and to values populated automatically (see Integrating the Dicomizer).
Tip
The thumbnail right-click menu offers:
- Edit (images only) — opens the Photo Editor to crop, rotate, or adjust the image. Double-clicking the thumbnail has the same effect.
- Remove — deletes the image from the series without touching the original file.
- Move to… — moves the image to a different series.
Edit the Images
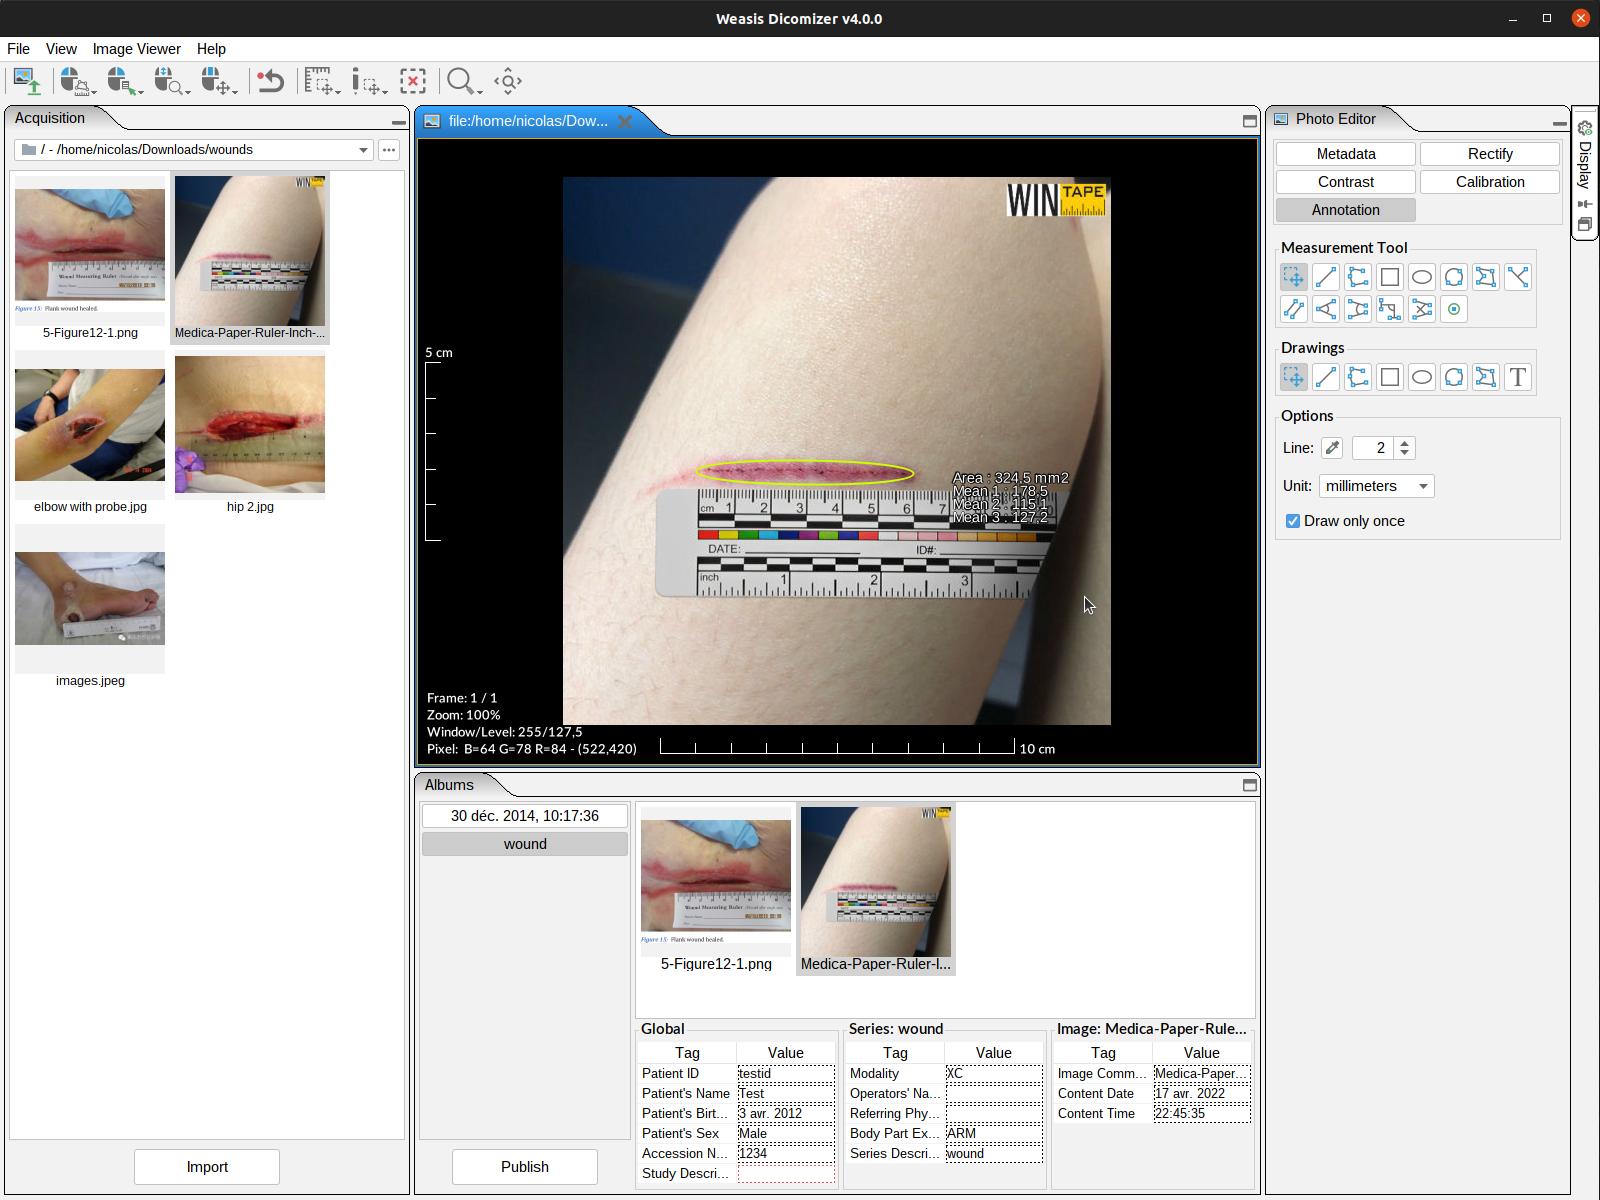
The Photo Editor offers basic tools to crop, rotate, and adjust contrast on an imported image. You can also add annotations to highlight specific areas, and use measurement tools to indicate distances, angles, or areas. The image can be calibrated against a known distance so that the measurements reflect real-world dimensions.
Publish DICOM Files
Click Publish to send the DICOM files to a remote DICOM archive, or Export locally to save them on the local file system. The Publication panel offers:
- Selection — choose which DICOM items to publish (everything selected by default).
- Resolution — downscale high-resolution images before sending.
- Destination — pick the target node from the list of configured remote DICOM nodes.
- Calling AE Title — pick the calling node, if your archive enforces specific sender AE titles.
Note
The destination can be a specific remote node or the list of remote nodes configured under File > Preferences (Alt + P) > DICOM node list — add or edit DICOM nodes there.
Info
A green check-mark icon on a thumbnail confirms that the image was successfully published.
Integrating the Dicomizer
This section is intended for administrators integrating the Dicomizer into a clinical workflow. It covers launching the Dicomizer from a web context and — most importantly — populating the DICOM metadata automatically so that operators do not have to enter it manually.
Launch from a Web Context
The Dicomizer can be launched from a web context using the weasis:// protocol.
Try launching the Weasis Dicomizer with the following parameters:
Automatically Fill in the Metadata
Instead of being entered by hand in the Album panel, the Global tags (patient and study levels) can be populated automatically:
-
From a DICOM Worklist — configured with the preference items starting with
weasis.acquire.wkl. Example of configuration at launch: -
Via the acquire:patient command — pass a DICOM-style XML payload, for example:
Note
Which DICOM tags appear, are editable, and are required in the Album panel is configured via the preferences (items starting with weasis.acquire.meta).
Publication Destination
When the Dicomizer destination is fixed in the preferences (items starting with weasis.acquire.dest), the destination is no longer selectable in the Publication panel — DICOM files are sent directly to the configured node.