The Basics section is the reference layer of the Weasis documentation. It targets administrators, integrators, and power users who deploy Weasis into a clinical or research environment and need to understand its internals — beyond what an end user needs to know to read a study.
You will find:
Architecture — the OSGi-based plugin model, how the application boots, and how a plugin fits into the runtime.
Customize — application preferences, integration with a PACS or web portal, and plugin packaging.
Weasis is built on a modular architecture powered by OSGi: the dynamic module system for Java. This design allows for a highly flexible, dynamic, and extendable structure. At its core, Weasis utilizes the Apache Felix OSGi framework, a lightweight open-source implementation of the OSGi specification.
Key Architectural Features
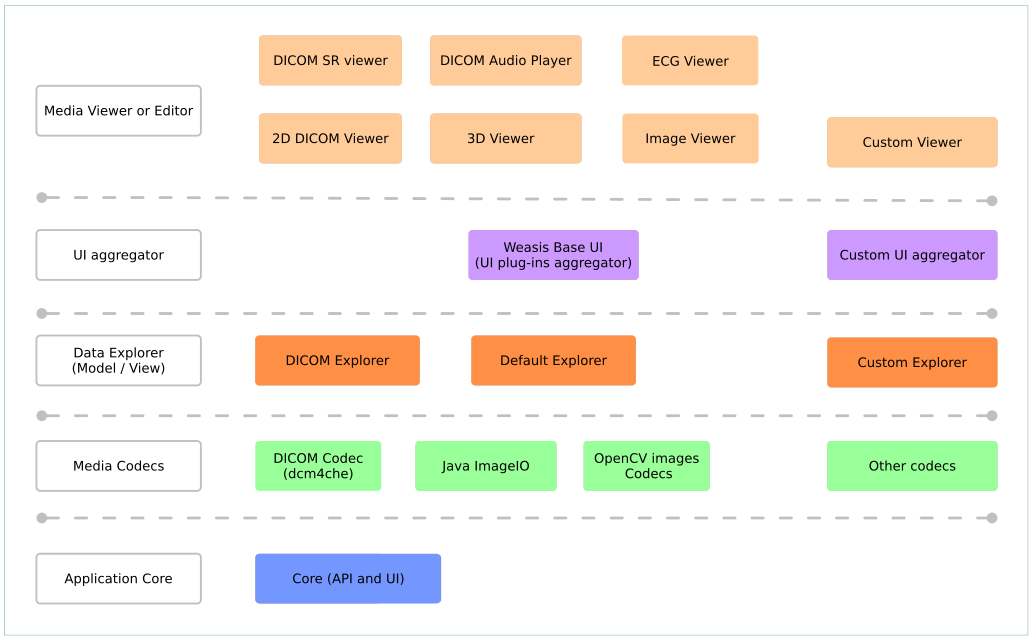
The following diagrams illustrate the main plugin types (known as bundles in OSGi terminology) and their relationships. These include Viewer, Viewer Tool Pane, Tool Bar, Data Explorer, and Codec bundles, which are dynamically registered using Declarative Services—a mechanism to seamlessly provide or consume services in the OSGi environment.
Understanding The Categories of Plugins
Weasis employs a modular approach, where individual plugins (or bundles in OSGi terminology) handle specific functionalities. Here are the plugin categories represented by layers in the diagram:
Media Viewer and Editor
This category handles the main viewing and editing functionalities. Except the 2D viewer, it includes specialized viewers for different modalities and representations.
UI Aggregator
UI Aggregator plugins bring together various interface components to create a cohesive and user-friendly experience. They dynamically adapt the interface to include provided tools or modules, ensuring that Weasis remains customizable and modular.
Data Access and Management (Data Explorer)
This category focuses on managing how data is loaded, retrieved, and handled within the system.
Codec (Media Decoding)
Codec plugins are responsible for decoding and interpreting medical media files in the DICOM format and other supported formats. They sometimes include native libraries.
Utility and Core Services
This plugin provides essential utility functions and core services needed to support the other modules.
Each of these categories contributes to the flexibility and extensibility of Weasis, enabling it to be customized and adapted to different clinical and research workflows.
Fragment Bundles
A fragment bundle is a special type of bundle that is attached to a host bundle to provide additional resources or classes. In Weasis, fragment bundles are used to provide translations and native libraries for codecs. This design allows for a clean separation of concerns and ensures that only the required resources are loaded at runtime.
Bundle Translation Management
Each bundle has its translation files packaged in a separate bundle fragment (ending in i18n), an OSGi concept that merges these files dynamically during runtime. This design allows translations to be maintained independently, and they are automatically loaded by the application whenever they are available.
Codec Support with Native Libraries
Certain Codec bundles contain fragments with native libraries (using JNI wrappers). The Weasis launcher dynamically loads only the required native binaries relevant to the platform on which it is running, ensuring lightweight and efficient operation.
Shortcuts
Keyboard and Mouse Shortcuts
Here is a list of the default keyboard and mouse shortcuts in Weasis. The shortcuts are divided into different categories for better understanding.
Note
Since v4.7.0, most keyboard shortcuts can be customized in Preferences > General > Keyboard Shortcuts. This page documents the default configuration. To get the current configuration (including any customizations), use Help > Keyboard Shortcuts (this page is internationalized).
Central panel containing viewers and editors
Shortcut
Action
Ctrl + Tab
Select the next tab
Ctrl + Shift + Tab
Select the previous tab
Ctrl + Shift + E
Open the docking panel list for selection
Ctrl + M
Maximize/Restore the selected tab
Ctrl + W
Close the tab
Ctrl + E
Externalize the tab (when multiple screens)
Ctrl + N
Normalize the tab
Tab Right-click
Open the contextual menu for more options (Close Others, All, Maximize)
Selected view in the 2D DICOM Viewer
Shortcut
Action
Left Arrow
Display previous series
Right Arrow
Display next series
Page Up
Display first series
Page Down
Display last series
Ctrl + Left Arrow
Display previous study
Ctrl + Right Arrow
Display next study
Ctrl + Page Up
Display first study
Ctrl + Page Down
Display last study
Up Arrow
Display previous image
Down Arrow
Display next image
Home
Display first image
End
Display last image
Shift + Up Arrow
Go 10 images back
Shift + Down Arrow
Go 10 images forward
Ctrl + Up Arrow
Display previous patient
Ctrl + Down Arrow
Display next patient
Ctrl + Home
Display first patient
Ctrl + End
Display last patient
Tab
Go to the next view when layout has more than one view
Shift + Tab
Go to the previous view when layout has more than one view
Alt + Up Arrow
Move image up 5 pixels (with Pan action)
Alt + Down Arrow
Move image down 5 pixels (with Pan action)
Alt + Left Arrow
Move image left 5 pixels (with Pan action)
Alt + Right Arrow
Move image right 5 pixels (with Pan action)
Alt + Shift + Up Arrow
Move image up 10 pixels (with Pan action)
Alt + Shift + Down Arrow
Move image down 10 pixels (with Pan action)
Alt + Shift + Left Arrow
Move image left 10 pixels (with Pan action)
Alt + Shift + Right Arrow
Move image right 10 pixels (with Pan action)
Ctrl + NumPad +
Zoom in
Ctrl + NumPad -
Zoom out
Ctrl + Enter
Set zoom to best fit
T
Translate (pan) the image canvas
W
Window / Level
S
Series scroll
Z
Zoom
R
Rotation
H
Crosshair: in multiview mode synchronizes the crosshair position to all the views (Note: Ctrl + click or Ctrl + Shift + click allows changing the Window/Level values)
C
Cine Start / Stop
M
Measure
D
Distance measurement
A
Angle measurement
Y
Polyline measurement
G
Draw
B
Textbox
N
No Action
Q
Context menu
Ctrl + Spacebar
Change to the next action
Ctrl + mouse drag
Accelerate the current action
Ctrl + Shift + mouse drag
Accelerate more the current action
Alt + R
90° rotation (clockwise)
Alt + L
90° rotation (counterclockwise)
Alt + F
Flip horizontally (after rotation action)
0 1 2 3…
DICOM presets
K
Toggle key image state
Spacebar
Show/Hide all the annotations (three states)
I
Show/Hide all the annotations (three states)
Escape
Reset the selected view
P
Print view(s) with the operating system printer
Right-click
Open the contextual menu for more options
Double click or F11
Toggle fullscreen (F11 since v4.5.2)
Left mouse drag
Perform the selected left mouse action (default: Window/Level)
Middle mouse drag
Perform the selected middle mouse action (default: Pan)
Mouse scroll
Perform the selected scroll action (default: Series scroll)
Drag files/directories (from the OS file manager)
Open DICOMs files
Selected view in the MPR Viewer
MPR view inherits the same shortcuts as the 2D viewer, with the following additional shortcuts since v4.6.0 :
Shortcut
Action
Alt + X
Center crosshair of the selected view
Alt + C
Show/Hide the crosshair center of the selected view
Alt + V
Show/Hide the crosshair of the selected view
Ctrl + Alt + X
Center crosshair of all views
Ctrl + Alt + C
Show/Hide the crosshair center of all views
Ctrl + Alt + V
Show/Hide the crosshair of all views
Ctrl + Alt + B
Change the MIP type (None/Min/Mean/Max)
Alt + mouse scroll
On selected axis, increase/decrease the MIP thickness
DICOM explorer
Shortcut
Action
Ctrl + click on the thumbnail
Select multiple series
Click on a thumbnail and then Shift + click on another one
Select all series between
Ctrl + A
Select all the series
Home or Page Up
Select the first series
End or Page Down
Select the last series
Up Arrow
Select previous series
Down Arrow
Select next series
Enter
Open the selected series in the default viewer
Click + drag a thumbnail in the main view
Display a series
Right-click
Open the contextual menu for more options
Drag files/directories (from the OS file manager)
Open DICOMs files
Note
Downloading Priorities: Selecting a thumbnail gives the best priority to download.
Graphics
Shortcut
Action
Click on a graphic
Select a Graphics
Click + mouse drag
In selection mode: select all the graphics inside the selection area. In drawing mode: draw the selected graphic shape.
Ctrl + A
Select all the graphics
Ctrl + D
Deselect all the graphics
Delete
Delete the selected graphics
Shift + click on a graphic
In selection mode: add or remove a graphic to the current selection. In drawing mode: force to draw on another graphic (without shift the graphic is selected).
Double click
Stop adding points for polyline (also available in the context menu)
Right-click
Open the contextual menu for more options
Tips and Tricks
Window / Level Adjustment
Move the mouse horizontally to the right to increase the window width (reduce the perceived contrast).
Move the mouse vertically upwards to lower the window center (increase the perceived brightness).
Tip: Use Preferences to reverse the direction of level adjustments.
Drawing a Segment
You can draw a segment in two ways:
Click + Drag: Click, drag to draw, then release.
Click > Release > Drag: Click to start, release, drag to draw, and release again.
Standard workflow when connecting Weasis to a PACS, RIS, EMR, EPR or any web interface:
Note
The schema above shows that the queries to the PACS are made at the same time as the viewer starts. This makes it possible to optimize the launch by simultaneously launching weasis and building the manifest.
Tip
weasis-pacs-connector services allow either to build a manifest from a PACS via DICOM C-Find or to upload the manifest by http POST.
Build your own connector
This documentation describes how to create your own connector without weasis-pacs-connector and with different DICOM archive types. The weasis protocol allows you to build URIs to launch Weasis according to different configurations and allows to load DICOM files locally or remotely.
Here are examples with XML manifests or with DICOMWeb RESTful services.
Build an XML manifest
Use $dicom:get to load a XML manifest returned by your service.
Build an XML file containing the UIDs of the images which will be retrieved from Weasis. There is XLS to validate the content of xml. This output file can be either compressed in gzip or uncompressed. Here is an example:
Important Parameters (except mandatory parameters defined in xsd):
PatientBirthDate helps to identify a patient.
StudyDate,StudyTime, Modality, SeriesNumber and InstanceNumber help to sort data before downloading images.
SeriesDescription and StudyDescription allow immediately displaying the descriptions before downloading the images.
Tip
From Weasis 2.5 it is possible to have multiple archives (allows several arcQuery tags) and the presentations tag which contains the image annotations.
Build an XML manifest (no WADO server)
This example requires only a WEB server. Weasis will download DICOM files by URLs.
DirectDownloadFile defines the URL of the DICOM file to download (the final URL is the combination of wadoURL + DirectDownloadFile)
DirectDownloadThumbnail defines the URL of the JPEG file representing the series (the final URL is the combination of wadoURL + DirectDownloadThumbnail)
See in the previous note above.
Download directly with DICOMWeb RESTful services
This integration requires a PACS/VNA with DICOMweb services (QUERY/RETRIEVE) where the requests are managed directly by Weasis. Here are some of the advantages:
Straightforward integration
Do not require to install weasis-pacs-connector
Allow passing token directly in headers (not in the URL)
The following configurations allow images to be loaded by initiating the request from a WEB context. However, it is possible to access DICOMWeb services by initiating the request directly from the Weasis import.
Use $dicom:rs to load DICOM files. Here are some configuration examples of DICOMweb applications:
dcm4chee-arc-light
This configuration requires at least dcm4chee-arc-light 5.22.2 and Weasis 3.6.0. To activate Weasis in dcm4chee-arc-light user interface, you need to add the four following properties in the web portal from the left menu Configuration > Devices > dcm4chee-arc > Extensions > Edit extension > Child Objects > Web Applications > DCM4CHEE
The character ‘&’ must be escaped in the Docker environment variables.
The Authorization header is not required for unsecure service.
URL with HTTPS requires a real valid certificate; otherwise, the certificate must be imported into the Weasis Java keystore or must be installed at system level (from Weasis 4.6.1).
Note
Known issue on Windows: Weasis cannot open the images because of the token length which is cut by the browser. It is only working with Firefox on Windows. It is recommended to use weasis-pacs-connector or ViewerHub to solve this issue.
Prefer to use dicomweb-proxy to manage the token and the URL of the DICOMWeb service. See Weasis configuration at the end of this page.
Preferences
ViewerHub (is a separate project that will be available soon) is a tool designed for managing server-side Weasis preferences across all native client installations. The preferences are defined in each release package (bin-dist/weasis/conf within weasis-native.zip) and can be modified either through the ViewerHub web portal or via the Weasis protocol with the pro parameter.
Some server-side preferences are applied by Weasis only during the initial launch, as they can later be adjusted in the Weasis user interface. On the other hand, certain server-side preferences are utilized by Weasis during every launch and cannot be modified through the User Interface (client-side).
Changing Preferences in Weasis
Client-Side Preferences
Local preferences can be modified in the following ways:
Through the Weasis User Interface: Navigate to File > Preferences.
Using the Weasis Protocol: Use the weasis:config command with the pro parameter.
Server-Side Preferences
Server-side preferences can be updated using any of the following methods:
Through the ViewerHub Web Portal: Manage preferences directly via the web portal for all users, for user group or for a specific hostname.
By Extending the Configuration File: Create a new JSON file to extend the base.json configuration.
The default value of the property (see table below)
Example to change language property (It will work only during the first launch of Weasis on a user session, otherwise delete ${user.home}/.weasis/preferences/).
If you are using weasis-pacs-connector, add the propertylocale.lang.code:
The preferences listed below are extracted from the base.json file, which is located in the source code.
The properties are grouped into categories (note: not all categories are shown in the list below), and each property includes the following details:
Property Key: The name of the property, used as a key by the viewer.
Default Value: The property’s default value, provided after the arrow. If it is marked as Null, the property is not set by default.
First Badge: The JavaType of the property, indicating its type in Java (String, Integer, Boolean, etc.).
Second Badge: Represents the Type, defining how the viewer handles the property:
F: Processed only during the viewer’s initial launch as it can be adjusted in the client-side preferences.
A: Always processed by the viewer.
AP: Always processed by the viewer but only from base.json or other .json files.
Description: A brief explanation of the property, provided on the second line.
Base preferences
Dicom Category
weasis.aetNull
string
A
Calling AETitle for DICOM send and Dicomizer publish. ? null means displaying the DICOM calling node combobox otherwise the combo is not displayed and the value is directly used
weasis.dicom.root.uid2.25
string
A
Set values for dicom root UID when creating DICOM objects (KO or PR). See company list at https://www.iana.org/assignments/enterprise-numbers
weasis.download.immediatelytrue
boolean
F
Start to download series immediately
download.concurrent.series3
int
A
Controls the number of series downloaded simultaneously
download.concurrent.series.images4
int
A
The number of concurrently downloaded images within a series
weasis.rt.dvh.recalculate.enabletrue
boolean
F
Enables experimental DVH (re)calculation in the RT plugin (derived from dicompyler, not clinically validated). When false (default), only DVHs stored in RTDOSE files are displayed.
General Category
weasis.themeorg.weasis.launcher.FlatWeasisTheme
string
F
FaltLaf Look and feel, see https://www.formdev.com/flatlaf/themes/
weasis.confirm.closingfalse
boolean
F
Show a message of confirmation when closing the application
locale.lang.codeen
string
F
Specifies the language code (see Java Locale: https://www.oracle.com/java/technologies/javase/jdk20-suported-locales.html). Default value is "en".
locale.format.codesystem
string
F
Uses the operating system's locale (on the client-side) with "system".
For other values refer to Java Locale: https://www.oracle.com/java/technologies/javase/jdk20-suported-locales.html
weasis.auth.back.port0
int
A
Define the port for the authentication callback. 0 means random port
Launch Category
weasis.clean.previous.versiontrue
boolean
A
If true, the bundle cache is cleared when the weasis version has changed from the previous launch
weasis.main.uiweasis-base-ui
string
A
Application main user interface bundle. Mandatory with the default launcher.
weasis.nameWeasis
string
AP
Change the name of the application everywhere in UI
weasis.profiledefault
string
AP
Application profile: when no profile name is provided, the value is "default".
It allows having a custom preferences' directory on the client side (will not share preferences with other Weasis instances)
weasis.userNull
string
AP
Defines a user name to store its own preferences. Null value will be the system user.
weasis.pref.store.local.sessionNull
string
AP
Store user preferences when weasis.user is not specified (only with remote preferences service)
flatlaf.uiScaleNull
string
F
Specifies a custom scale factor used to scale the user interface. Allowed values: e.g. 1.5, 1.5x, 150% or 144dpi (96dpi is 100%)
weasis.resources.url${dollar}{weasis.codebase.url}/resources.zip
string
A
Application resources (logo, presets, LUTs, dicom annotations configuration...)
"resources.zip" is downloaded again only when the last modified date has changed
weasis.show.disclaimertrue
boolean
A
Show a disclaimer at the first launch of Weasis (requires to be accepted to start the application)
weasis.show.releasetrue
boolean
A
Show a message when the release has changed
weasis.update.releasetrue
boolean
A
Show a message when a new release is available
weasis.portable.dicom.directorydicom,DICOM,IMAGES,images
string
A
For loading automatically DICOMs in the portable Weasis distribution (CD/DVD).
Comma-separated directories relative to the Weasis executable file.
Log Category
felix.log.level1
int
A
Set the logging levels for OSGI framework 0=None / 1(default)=Error / 2=Warning / 3=Information / 4=Debug
org.apache.sling.commons.log.levelINFO
string
F
Application logging level. This may be any of the defined logging levels TRACE, DEBUG, INFO, WARN, ERROR
org.apache.sling.commons.log.file.activatefalse
boolean
F
Activation of rolling log files
org.apache.sling.commons.log.file.number20
int
F
The max number of rolling log files
org.apache.sling.commons.log.file.size10MB
string
F
The max size of a rolling log file
org.apache.sling.commons.log.pattern%d{dd.MM.yyyy HH:mm:ss.SSS} *%-5level* [%thread] %logger{36}: %msg%ex{3}%n
string
F
Log pattern: {0} The timestamp of type java.util.Date, {1} the log marker,
{2} the name of the current thread, {3} the name of the logger, {4} the debug level and {5} the actual debug message.
org.apache.sling.commons.log.stack.limit3
int
F
Defines the maximum number of lines for stack trace (0 => NONE, -1 => ALL). Default value is 3
audit.logfalse
boolean
A
Audit log for usage statistics in Weasis
Ui Category
weasis.import.imagestrue
boolean
A
Show the import image toolbar and menu
weasis.import.dicomtrue
boolean
A
Show the DICOM import menu and dialog
weasis.import.dicom.qrtrue
boolean
A
Show the DICOM Q/R page in the DICOM Export dialog
weasis.export.dicomtrue
boolean
A
Show the DICOM export menu and dialog
weasis.export.dicom.sendtrue
boolean
A
Show the send page in the DICOM Export dialog
weasis.export.annotationsfalse
boolean
A
Show the Export Annotations button in the toolbar
weasis.toolbar.mouse.buttons7170
int
A
Show all mouse buttons. Sum of LEFT=1024 + MIDDLE=2048 + RIGHT=4096 + SCROLL=2. Show all:7170 and show none:0.
weasis.all.cinetoolbar.visiblefalse
boolean
A
Show all the cine toolbars
weasis.all.keyobjecttoolbar.visiblefalse
boolean
A
Show all the key object toolbars
weasis-dicom-viewer2d.all.rotationtoolbar.visiblefalse
boolean
A
Show the rotation toolbars in DICOM 2D viewer
weasis.contextmenu.lutShapefalse
boolean
A
Show LUT Shape in the contextual menu
weasis.contextmenu.lutfalse
boolean
A
Show LUT in the contextual menu
weasis.contextmenu.filterfalse
boolean
A
Show Filter in the contextual menu
weasis.plugins.licensetrue
boolean
A
Show license activation in Help menu
Viewer Category
weasis.color.wl.applytrue
boolean
F
Allow applying Window/Level on color images
weasis.level.inversetrue
boolean
F
Inverse level direction (moving the cursor down to increase brightness
weasis.apply.latest.prfalse
boolean
F
Apply by default the most recent Presentation State to the related image
weasis.force.3dfalse
boolean
A
Force to detect a graphic card at every launch
weasis.toolbar.mouse.leftwinLevel
string
F
Left mouse button action, possible values: pan|winLevel|sequence|zoom|rotation|measure|drawings|contextMenu|crosshair|none
weasis.toolbar.mouse.middlepan
string
F
Middle mouse button action, possible values: pan|winLevel|sequence|zoom|rotation|measure|drawings|contextMenu|crosshair|none
weasis.toolbar.mouse.rightcontextMenu
string
F
Right mouse button action, possible values: pan|winLevel|sequence|zoom|rotation|measure|drawings|contextMenu|crosshair|none
weasis.toolbar.mouse.wheelsequence
string
F
Mouse wheel action, possible values: sequence|zoom|rotation|none
Dicomizer preferences
Dicom Category
weasis.acquire.dest.hostNull
string
A
Hostname of DICOM send destination for Dicomizer. If no value, the list of DICOM nodes for storage is displayed.
weasis.acquire.dest.aetDCM4CHEE
string
A
AETitle of DICOM send destination for Dicomizer
weasis.acquire.dest.port11112
int
A
Port of DICOM send destination for Dicomizer
weasis.acquire.video.max.size1024
int
A
Maximum size in MB of a video file that can be imported into the Dicomizer. A video file larger than this value is rejected with a message. A value of 0 or less disables the limit.
Metadata Category
weasis.acquire.meta.global.displayPatientID,PatientName,PatientBirthDate,PatientSex,AccessionNumber,StudyDescription
string
A
Comma-separated list of patient and study tags which are displayed in UI. When a required tag has no value, it will be displayed.
weasis.acquire.meta.global.editStudyDescription
string
A
Comma-separated list of patient and study tags which are editable in UI. When a required tag has no value, it will be editable.
weasis.acquire.meta.global.requiredPatientID,PatientName,AccessionNumber,StudyDescription
string
A
Comma-separated list of patient and study tags which are required to publish an image
weasis.acquire.meta.series.displayModality,OperatorsName,ReferringPhysicianName,SeriesDescription
string
A
Comma-separated list of series tags which are displayed in UI. When a required tag has no value, it will be displayed.
weasis.acquire.meta.series.editReferringPhysicianName,SeriesDescription
string
A
Comma-separated list of series tags which are editable in UI. When a required tag has no value, it will be editable.
weasis.acquire.meta.series.requiredModality,SeriesDescription
string
A
Comma-separated list of series tags which are required to publish an image
weasis.acquire.meta.image.displayImageComments,ContentDate,ContentTime,AnatomicRegion
string
A
Comma-separated list of image tags which are displayed in UI. When a required tag has no value, it will be displayed.
weasis.acquire.meta.image.editImageComments,ContentDate,ContentTime,AnatomicRegion
string
A
Comma-separated list of image tags which are editable in UI. When a required tag has no value, it will be editable.
weasis.acquire.meta.image.requiredContentDate
string
A
Comma-separated list of image tags which are required to publish an image
weasis.acquire.meta.study.descriptionPictures of follow-up,Pictures of observation,Pictures preoperative,Pictures intraoperative,Pictures postoperative
string
A
Comma-separated list of study description elements (to obtain a selection in a combo box). Empty value will be an editable text field
weasis.acquire.meta.series.descriptionNull
string
A
Comma-separated list of series description elements (to obtain a selection in a combo box). Empty value will be an editable text field
Ui Category
weasis-base-viewer2d.all.rotationtoolbar.enablefalse
boolean
A
Show the rotation toolbar with base 2D viewer
weasis-base-viewer2d.all.importtoolbar.enablefalse
boolean
A
Show the import toolbar with base 2D viewer
weasis-base-viewer2d.all.minitool.enablefalse
string
A
Show the mini tool with base 2D viewer
weasis-base-viewer2d.all.imagetool.enablefalse
boolean
A
Show Image Tools with base 2D viewer
weasis-base-viewer2d.all.measuretool.enablefalse
boolean
A
Application
weasis.toolbar.layout.buttonfalse
boolean
A
Show the layout toolbar
weasis.toolbar.synch.buttonfalse
boolean
A
Show the synch toolbar
Customize resources
The default resources are located:
With ViewerHub you can upload a new package “resources.zip” for a specific release.
For the installed distribution in installedPath/app/resources
How to add DICOM nodes or DICOM printers at the server-side
From the graphical user interface, configure the DICOM printers from File > Print > DICOM Print or DICOM nodes from File > Preferences > Dicom node list
Go to the folder ${user.home}/.weasis/data/weasis-dicom-explorer
Copy the desired configuration files: dicomNodes.xml, dicomPrinterNodes.xml, dicomWebNodes.xml and dicomCallingNodes.xml
Paste at the root path of resources. For web distribution, unzip, place files and zip again.
The new configurations should appear for all the users as non-editable configurations in Weasis
Build Plugins
How to build and install a plugin
This page provides a guide on creating new Weasis plugins and explains how to integrate them into the distributions. For details on configuring the development environment, refer to this guidelines page.
Types of Plugins in Weasis
The following list describes the types of plugins, the interfaces they implement and the factories they use:
Media Viewer or Editor
Represents the main central panel and implements either ViewerPlugin or ImageViewerPlugin.
The factory for this type implements SeriesViewerFactory.
For DICOM special modalities, you can use DicomSpecialElementFactory to associate a viewer with a specific DICOM object.
Toolbar Associated with a Viewer
Implements the Toolbar or DynamicToolbar interface.
The factory for this type implements InsertableFactory
Tool Associated with a Viewer
Represents the right panel and implements DockableTool.
The factory for this type implements InsertableFactory.
Data Explorer
The explorer model implements DataExplorerModel.
The explorer view implements DataExplorerView.
The factory for this type implements DataExplorerViewFactory.
Import Data into an Explorer
Adds a new page into the DICOM Import UI with ImportDicom.
The factory for this type implements DicomImportFactory.
Export Data from an Explorer
Adds a new page into the DICOM Export UI with ExportDicom
The factory for this type implements DicomExportFactory.
Media Codec
Implements the Codec interface to decode and encode media files related to a file extension or a mime type.
Preferences
Implements PreferencesPageFactory to add a new page in the Preferences dialog.
UI Aggregator
Represents the bundle for the application’s main user interface which aggregates various interface components.
The Maven artifact for this bundle must be defined in the base.json file (e.g., code:weasis.main.ui value:weasis-base-ui).
Note
The factories are used to create the instances of the plugins and are registered as OSGi services. For performance reasons, the factories are created at startup and the plugins are created only if they are needed.
Tip
For more information about the plugin hierarchy and their relationships, refer to the Weasis Architecture.
Building Plugins Using Maven Archetype
To add the Weasis archetypes to your local Maven repository, go to the Weasis/archetype directory and execute the following command:
mvn install
Navigate to the target folder, which should be the parent folder of the new plugin project, and execute the following command to create your plugin:
mvn archetype:generate -DarchetypeCatalog=local
When prompted, enter the number of one of the archetypes. Currently, the following archetypes are available:
weasis-plugin-base-viewer-archetype: Example of a toolbar and tool for a non-DICOM viewer.
weasis-plugin-dicom-viewer-archetype: Example of a toolbar and tool for a DICOM viewer.
Modify the generated project as needed.
In the pom.xml file, ensure the <relativePath> tag corresponds to the location of your Weasis source folder. By default, the value is <relativePath>../Weasis/weasis-parent/pom.xml</relativePath> (In this scenario, the plugin resides in the same parent folder as the Weasis source code).
When the relative path is set correctly, <version>${revision}${changelist}</version> in the pom.xml file will automatically be updated to the latest version of the Weasis source.
For easier version management in the pom.xml, you can remove <version> at the project level to inherit it from the parent.
Build the plugin by executing the following command in the plugin project directory:
mvn clean install
Integrating Plugins into Weasis Distributions
Once the plugin is built, it can be integrated into the Weasis distributions either locally or remotely.
Warning
The plugin depends on the Weasis framework, and its version must align with the version of the Weasis distribution being integrated.
If the versions do not match, the plugin may fail to start and produce an error such as org.osgi.framework.BundleException: Unable to resolve myplugin ….
Testing the Plugin
To test the plugin with an installed version of Weasis without making any changes to the installed directory, create a JSON file that extends the configuration specified in base.json.
Create a new json file (e.g., myplugin.json) with the following content:
{"weasisPreferences":[{"code":"org.osgi.framework.startlevel.beginning","value":"550"},{"code":"felix.auto.start.500","value":"file:///git/myplugin/target/myplugin-4.5.2.jar","description":"Myplugin - a viewer for ..."}]}
Update the content of myplugin.json as required:
Ensure the plugin start level (above 500) is lower than the OSGi beginning level (above 550). Avoid using values below this range to prevent conflicts with other plugins.
For easier testing, use an absolute JAR path that matches your local plugin directory. Use a URI format for the path like:
file:///D:/git/myplugin/target/myplugin-4.5.2.jar
file:///git/myplugin/target/myplugin-4.5.2.jar
file:///git/myplugin/target/myplugin-4.5.2.jar
Launch Weasis with your configuration:
Use the following parameter to extend the configuration (adapt the path to your local file):
Build a valid URI with the above parameter (see How to build an URI) and launch Weasis from the command on a terminal:Construct a valid URI using the parameter mentioned above (refer to How to build a URI)) and launch Weasis from the terminal using a command:
open weasis://?%24weasis%3Aconfig%20pro%3D%22felix.extended.config.properties%20file%3A%2F%2F%2Fgit%2Fmyplugin%2Fmyplugin.json%22
Using ViewerHub
This feature will be available soon. It will allow you to manage the plugins and their configurations directly from the ViewerHub web portal.
Build OSGi Services
All the plugin type described in the list above are OSGi services that are registered and aggregated in the GUI. Building the plugin from the Maven archetype will configure the OSGi service automatically. For adding new OSGi services, here is the procedure:
Create a class that implements the Insertable interface and represents a visual component. For example,
publicclassMyPrefViewextendsAbstractItemDialogPage{publicMyPrefView(){super("My Preferences",100);// Provide a name and the page positioninitGUI();}privatevoidinitGUI(){// Add a basic JLabel to the preference panel for demonstrationadd(newJLabel("Welcome to My Preferences!"));}@OverridepublicvoidcloseAdditionalWindow(){// Handle any cleanup or saving preferences when closing}@OverridepublicvoidresetToDefaultValues(){// Reset preferences to default values}}
Create a class that implements one of the plugin factories and include the annotations @Component and the @Service parameter. For example,
The commands listed below can be applied at start-up or in a telnet session. All the commands starting with “dcmview2d:” allow you to drive Weasis and are not adapted to be used at start-up.
Info
This page matches to Weasis 3.5.1 or higher. The syntax of usage comes from POSIX.
To obtain the list of commands, after starting Weasis, open a local telnet session of the OSGI Console and type lb for getting the list of bundles and their state or type help for getting all the available commands:
telnet localhost 17179

Trying 127.0.0.1...

Connected to localhost.localdomain.

Escape character is '^]'.

____________________________

Welcome to Apache Felix Gogo

g!
List of Weasis commands
dcmview2d:layout
g! dcmview2d:layout
Select a split-screen layout
Usage: dcmview2d:layout ( -n NUMBER | -i ID )
  -n --number=NUMBER  select the best matching number of views
  -i --id=ID          select the layout from its identifier
  -? --help           show help
dcmview2d:mouseLeftAction
g! dcmview2d:mouseLeftAction
Change the mouse left action
Usage: dcmview2d:mouseLeftAction COMMAND
COMMAND is (sequence|winLevel|zoom|pan|rotation|crosshair|measure|draw|contextMenu|none)
  -? --help       show help
dcmview2d:move
g! dcmview2d:move
Pan the selected image
Usage: dcmview2d:move -- X Y
X and Y are Integer. It is mandatory to have '--' (the end of options) for negative values
  -? --help       show help
dcmview2d:reset
g! dcmview2d:reset

Reset image display
Usage: dcmview2d:reset (-a | COMMAND...)
COMMAND is (winLevel|zoom|pan|rotation)
  -a --all        reset to original display
  -? --help       show help
dcmview2d:scroll
g! dcmview2d:scroll
Scroll into the images of the selected series
Usage: dcmview2d:scroll ( -s NUMBER | -i NUMBER | -d NUMBER)
  -s --set=NUMBER       set a new value from 1 to series size
  -i --increase=NUMBER  increase of some amount
  -d --decrease=NUMBER  decrease of some amount
  -? --help             show help
dcmview2d:synch
g! dcmview2d:synch
Set a synchronization mode
Usage: dcmview2d:synch VALUE
VALUE is (None|Stack|Tile)
  -? --help       show help
dcmview2d:wl
g! dcmview2d:wl
Change the window/level values of the selected image (increase or decrease into a normalized range of 4096)
Usage: dcmview2d:wl -- WIN LEVEL
WIN and LEVEL are Integer. It is mandatory to have '--' (the end of options) for negative values
  -? --help       show help
dcmview2d:zoom
g! dcmview2d:zoom
Change the zoom value of the selected image
Usage: dcmview2d:zoom (set VALUE | increase NUMBER | decrease NUMBER)
  -s --set=VALUE        [decimal value]  set a new value from 0.0 to 12.0 (zoom magnitude, 0.0 => default, -200.0 => best fit, -100.0 => real size)
  -i --increase=NUMBER  increase of some amount
  -d --decrease=NUMBER  decrease of some amount
  -? --help             show help
dicom:get
g! dicom:get
Load DICOM files remotely or locally
Usage: dicom:get ([-l PATH]... [-w URI]... [-r URI]... [-p] [-i DATA]... [-z URI]...)
PATH is either a directory(recursive) or a file
  -l --local=PATH   open DICOMs from local disk
  -r --remote=URI   open DICOMs from a URI
  -w --wado=URI     open DICOMs from an XML manifest
  -z --zip=URI      open DICOM ZIP from a URI
  -p --portable     open DICOMs from configured directories at the same level of the executable
  -i --iwado=DATA   open DICOMs from an XML manifest (GZIP-Base64)
  -? --help         show help
dicom:close
g! dicom:close
Close DICOM files
Usage: dicom:close  (-a | ([-y UID]... [-s UID]...))
  -a --all           close all the patients
  -p --patient=ID    close a patient from its patient ID (since v4.4.1)
  -y --study=UID     close a study, UID is Study Instance UID
  -s --series=UID    close a series, UID is Series Instance UID
  -? --help          show help
dicom:rs
g! dicom:rs
Load DICOM files from DICOMWeb API (QIDO/WADO-RS)
Usage: dicom:rs -u URL -r QUERYPARAMS... [-H HEADER]... [--query-header HEADER]... [--retrieve-header HEADER]... [--query-ext EXT] [--retrieve-ext EXT] [--accept-ext EXT]
  -u --url=URL               URL of the DICOMWeb service
  -r --request=QUERYPARAMS   Query params of the URL, see weasis-pacs-connector
  -H --header=HEADER         Pass custom header(s) to all the requests
  --query-header=HEADER      Pass custom header(s) to the query requests (QIDO)
  --retrieve-header=HEADER   Pass custom header(s) to the retrieve requests (WADO)
  --query-ext=EXT            Additionnal parameters for Query URL (QIDO)
  --retrieve-ext=EXT         Additionnal parameters for Retrieve URL (WADO)
  --accept-ext=EXT           Additionnal parameters for DICOM multipart/related Accept header of the retrieve URL (WADO). Default value is: transfer-syntax=*
  --show-whole-study         when downloading a series, show all the other series (ready for download) from the same study
  -? --help                  show help
image:get
g! image:get
Load images remotely or locally
Usage: image:get ([-f file]... [-u url]...)
  -f --file=FILE     open an image from a file
  -u --url=URL       open an image from a URL
  -? --help          show help
image close
g! image:close
Close images
Usage: dicom:close (-a | ([-g UID]... [-s UID]...))
  -a --all         close all series
  -g --group=UID   close a group from its UID
  -s --series=UID   close an series/image from its UID
  -? --help        show help
weasis:info
g! weasis:info
Show information about Weasis
Usage: weasis:info (-v | -a)
  -v --version    show version
  -a --all        show weasis specifications
  -? --help       show help
weasis:ui
g! weasis:ui
Manage user interface
Usage: weasis:ui (-q | -v)
  -q --quit     shutdown Weasis
  -v --visible  set window on top
  -? --help     show help
acquire:patient
g! acquire:patient
Load Patient Context from the first argument
Usage: acquire:patient (-x | -i | -s | -u) arg
arg is an XML text in UTF8 or an url with the option '--url'
  -x --xml         open Patient Context from an XML data containing all DICOM Tags
  -i --inbound     open Patient Context from an XML data containing all DICOM Tags, decoding syntax is [Base64/GZip]
  -s --iurlsafe    open Patient Context from an XML data containing all DICOM Tags, decoding syntax is [Base64_URL_SAFE/GZip]
  -u --url         open Patient Context from a URL (XML file containing all DICOM TAGs)
  -? --help        show help
Depending on the command line system, quotes or double quote needs to be escaped with a backslash. With IDE, a simple quote must be escaped in Eclipse but not in Intellij.
System Resources
Weasis routinely handles studies far larger than its memory: a CT or MR series is
hundreds of slices, a digital mammography image is tens of megabytes, a 3D volume
is hundreds of megabytes. The System resources panel shows, in real time, how
much of the machine Weasis is using, whether the hardware matches your daily
practice, and — when it does not — what to upgrade.
Open it from the menu Help > System resources.
The panel does not change anything by itself. It is a diagnostic view: it observes,
measures across all your sessions, and gives a verdict you can act on.
How memory works in Weasis
To read the panel, it helps to know that Weasis uses memory in two separate pools:
JVM heap — holds the user interface, the DICOM metadata and temporary
copies of pixels. Its maximum size is fixed when Weasis starts.
Native image memory — holds the decoded pixel data of images. This is the
pool that grows when you open large studies. It is not part of the heap; it
is sized from the physical memory of the machine.
A third pool, GPU memory (VRAM), is used only by the 3D viewer.
This separation is why a single “memory” number is not enough — and why the panel
shows both pools side by side.
Reading the panel
The dialog refreshes every two seconds while it is open. It has five sections.
Hardware
A static description of the machine:
Row
Meaning
Operating system
OS name, version and architecture
CPU cores
Number of processor cores available to Weasis
Physical memory
Total RAM of the machine
JVM heap maximum
Upper bound of the heap pool
Native memory budget
Upper bound of the decoded-image pool
Graphics processor
The GPU detected by the 3D viewer, and its OpenGL version
Note
The graphics processor row stays not assessed until a 3D view has been opened
at least once — Weasis only learns the GPU when the 3D engine starts. If it reports
software rendering, the 3D viewer is running without GPU acceleration and will
be slow; install or enable a proper graphics driver.
Live pressure
Three bars showing current use, each with its peak value for the session:
JVM heap — interface and metadata memory.
Native image memory — decoded images currently cached.
CPU load — processor use by Weasis.
A bar turning red above 90 % means that pool is close to its limit. Native
image memory reaching its limit is normal and harmless: Weasis simply drops the
least-recently-seen images from the cache and reloads them transparently when you
scroll back. A heap bar staying near 100 %, on the other hand, is a real warning
sign.
Assessment
The verdict — the heart of the panel. Each line is rated with one of four levels:
Level
Color
Meaning
Collecting…
neutral
Not enough activity yet to judge — keep using Weasis
Sub-optimal
red
The resource limited Weasis; the machine should have more
Optimal
green
The resource matched the workload well
Abundant
blue
The resource was barely used; the machine has spare capacity
Overall — the worst of the rows below.
Memory — based on real failure signals, not on raw usage: out-of-memory
errors, a 3D volume that had to spill to disk, or sustained garbage-collection
overhead. A rare event is tolerated; a recurring one turns the verdict red.
CPU — sub-optimal on 2 cores or fewer; abundant on 8+ cores left mostly idle.
Recommended upgrade — see below.
Info
The verdict is cumulative across all your sessions, not just the current one.
It stays Collecting… until Weasis has run long enough and done enough work to
judge fairly, so a fresh installation will not show a verdict immediately.
Workload
What the heaviest study you opened actually demanded: the largest image (in
megabytes) and the largest volume (in number of slices). These explain why
a verdict came out the way it did.
Events (all sessions)
The counters behind the memory verdict, accumulated over every session:
Counter
What it means
Session uptime
This session, then total time and number of sessions
Cache evictions
Images dropped from the cache and reloaded — informational, not a problem
Out-of-memory errors
The heap ran out — turns red when it is driving a sub-optimal verdict
Volume disk spills
A 3D volume did not fit in memory and was written to disk — slow
Garbage-collection overhead
Share of time spent reclaiming heap memory; above ~10 % the heap is too small
A non-zero count is not necessarily a problem — the panel colors a counter red
only when it is the signal currently causing a sub-optimal memory verdict.
Acting on the recommendation
When Memory or CPU is sub-optimal, the Recommended upgrade line gives a
concrete target. Weasis distinguishes a configuration problem from a hardware
one:
A larger heap (-Xmx) — shown when the machine has free RAM but Weasis was
not allowed to use enough of it. This is fixed by changing a setting, not by
buying hardware.
More RAM — shown when the heap is already a fair share of physical memory:
the machine itself is the limit.
More CPU cores — shown when too few cores slowed image decoding and
reconstruction.
Increasing the memory limits
The heap maximum and the native-memory budget are controlled by start-up options.
The simplest way to raise the heap is the -Xmx option; the native-image pool is
controlled by a Weasis property:
Option / property
Effect
Default
-Xmx<size>
Absolute maximum of the JVM heap, e.g. -Xmx4g
25 % of RAM
weasis.native.memory.percent
Native image memory as a percentage of RAM (1–90)
50
For an installed Weasis, edit the java-options of the application configuration
(for example app/Weasis.cfg next to the installation). For a study workstation
that opens large studies, raising the native-memory percentage keeps more images
cached and avoids reloads:
weasis.native.memory.percent=70
Warning
The heap and the native pool share the same physical RAM, so keep their combined
share comfortably below 100 %. Raising the heap reduces the room left for the
image cache. On a machine with little RAM, raising one means lowering the other.
The Copy report button places a plain-text summary of the whole panel on the
clipboard — hardware, verdict, recommendation and event counters. Paste it into a
bug report or a message to your IT
department when asking for a hardware upgrade.
Tip
The verdict and the limiting events are also written to the Weasis log files in
<user home>/.weasis/log/, and the cumulative statistics are kept in
<user home>/.weasis/resource-stats.properties. You do not need the panel open
for Weasis to keep measuring.