DICOM 2D Viewer
Displaying DICOM images
The 2D viewer is the default viewer when opening a DICOM series containing images.
Open the 2D viewer
The 2D view can be opened with in the toolbar or by right-clicking on the thumbnail in the DICOM explorer.
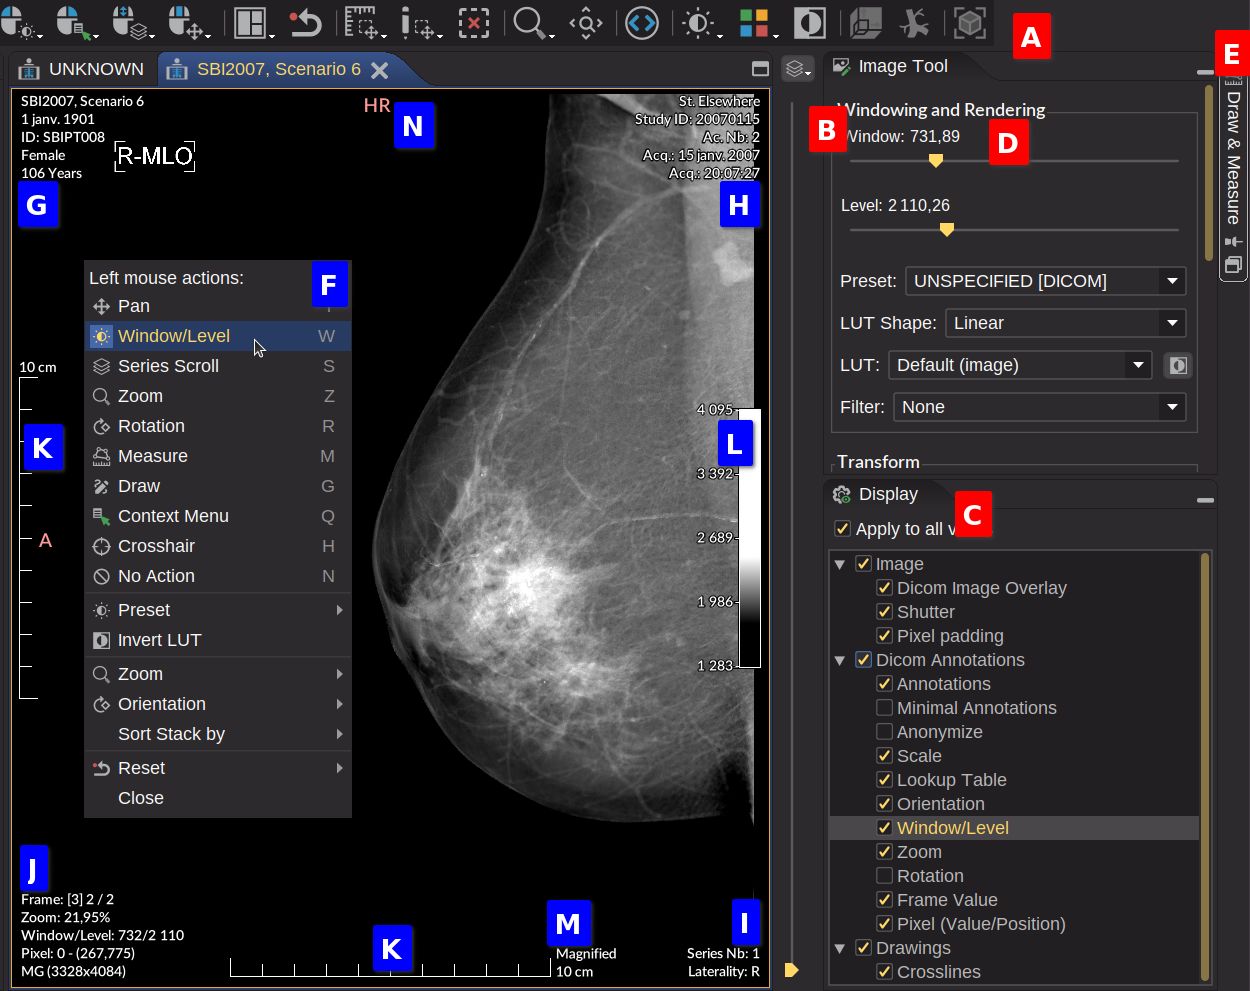
The rulers K show a real size when it can be calculated from the DICOM file. When a text M above the calibration is displayed, it gives information about the calibration type. Here are some examples:
- At dector: The calibration of the projection radiographic image is done at the detector level
- Magnified: The calibration of the projection radiographic image is corrected using the magnification factor (e.g. mammography, see the image above)
- Used fiducials: The calibration is based on fiducials (e.g. manual calibration with a ruler in the image)
- At scanner: The calibration comes from a media which has been digitized (e.g. film digitizer)
Toolbars A
Viewer Main Bar

Select the preferred actions for the three mouse buttons and the mouse wheel:
- Mouse left button: The default value is Window/Level. Action can also be changed from the context menu F and the key shortcuts.
- Mouse right button: The default value is Context Menu
- Mouse wheel: The default value is Series Scroll
- Mouse middle button: The default value is Pan
Where the possible actions are:
- Pan: Move the image position. T key to select the action. Alt + Arrows keys to pan when another action is selected.
- Window/Level: Change the contrast of the image. W key to select the action.
- Series Scroll: Scroll through the images of the current series. S key to select the action.
- Zoom: Zoom in/out the image. Z key to select the action.
- Rotation: Rotate the image with a free angle. R key to select the action.
- Measure: Draw a graphic for measuring something. M key to select the action.
- Draw: Draw a graphic for annotating. G key to select the action.
- Context Menu: Display the context menu. Q key to select the action.
- Crosshair: 3D cursor. H key to select the action. Ctrl + click or Ctrl + Shift + click allows changing Window/Level.
- No Action: Do nothing. N key to select the action.
When dragging, accelerate the action by pressing the Ctrl key and Ctrl + Shift to accelerate more.
- Default layout: Change the layout of the view. DICOM Information and Histogram are specific layouts where information is automatically updated when scrolling through the series.
- Synchronize: The synchronization feature lets you apply the same settings to other images.
- None: No synchronization is applied between series.
- Default Stack: When selected, the layout is synchronized (window/level, scrolling, zoom) only with the series sharing the same Frame of Reference UID (0020,0052). This is the default behavior.
- Default Tile: When selected, the layout is applied in tiled mode (image mosaic of the current series) and is synchronized (window/level, scrolling, zoom) with the image of the same series.
- Reset: Reset the image rendering (see below). Escape key to select the action.
Toolbars available in the DICOM 2D viewer
- DICOM Import
- DICOM Export
- Screenshot
- Viewer Main Bar (see above)
- Measurement
- Zoom
- Rotation: Rotate the image by 90° clockwise or flip it horizontally. Note visible by default.
- DICOM Header
- Lookup Table
- Basic 3D: MPR and MIP (disabled if the series has less than 5 images)
- 3D Viewer (disabled if the series has less than 5 images)
- Cine
- Key Object Selection
Toolbars can be shown or hidden from the View top menu.
Viewer’s tools
Here is a list of the tools which are associated to the DICOM 2D viewer.
The mini-tool is always visible and the other tools are displayed by clicking on the vertical button. The normalize button allows you to insert the panel into the main layout. Otherwise, the panel is displayed as a popup window with the pin option (which is not recommended, as it hides other panels).
Mini-tool B
Allows you by default to scroll through the images of the selected series (surrounded by an orange line). From the combobox at the top, the mini-tool can also be configured to change the zoom or the rotation of the image.
Display C
It lets you control the display of the image and the graphic objects.
The Apply to all views option allows you to apply the same display settings to all the views within the selected tab. If unchecked, the display settings are only applied to the selected view (surrounded by an orange line).
Image
Display options for the image. Unchecking the Image option will hide the image and display only the annotations and the graphic objects. The other options are related to DICOM specifications:
- Dicom Image Overlay: Apply the DICOM overlays when checked. The overlay color can be changed.
- Shutter: Apply the DICOM shutters when checked
- Pixel Padding: Apply the DICOM pixel padding when checked
Dicom Annotations
Display transformation properties and DICOM information on the image.
- Annotations: Display DICOM information on the image corners:
- G The top left: Patient information
- H The top right: Study information
- I The bottom right: Series information (related to the modality type)
- J The bottom left: Image information and its position in the series
- Minimal Annotations: Reduce the number of annotations. Use space or i key to toggle between the 3 states (minimal, none, all).
- Anonymize: Hide identifying information only in the views not in other places of the GUI like the tab title. Must be used with the screenshot tool when exporting image.
- Scale: Display the rulers on the left and the bottom of the image K
- Lookup Table: Display the LUT on the image
- Orientation: Display the orientation of the image N
- Window/Level: Display the window and level values J
- Zoom: Display the zoom value J
- Rotation: Display the rotation value J
- Frame Value: Display the frame number J
- Pixel (Value/Position): Display the pixel value and the position of the cursor J
Drawings
Check/uncheck to show/hide the graphic objects (see Draw & Measure).
Image Tools D
Image Tools contains all the tools to modify the image rendering.
Windowing and Rendering
Transform
Allows you to zoom, rotate and flip the image. Zoom and rotation can also be configured with the mini-tool or the mouse actions.
Cine
The Cine start button lets you scroll through the images in a series at a certain speed (frame per second). The speed values comes from the DICOM file if exists. The cine options can also be changed from the context menu.
- Click on Cine stop button to end the animation.
- Click on Loop Sweep toggle button to change the cine mode: looping vs sweeping.
When the cine is active, the series which are synchronized are also animated. The cine is also applied to other series when they are selected until the Cine stop button is clicked.
When a series have a variable frame rate. The speed is changed automatically. So the speed value entered manually is not preserved.
A Cine toolbar is also available. It is not visible by default, but can be displayed from the View menu.
Reset
It allows you to return to the default image rendering for all or specific parameters. Also available from the toolbar button or from the context menu.
Draw & Measure E
Other specific tools
- DICOM RT tools (for radiotherapy studies)
- DICOM Segmentation tools (not yet available)
Preferences
From the menu “File > Preferences > Viewer > “2D Viewer”:
Mouse Action Sensitivity
The sensitivity of the mouse drag can be changed according to your preferences for the following actions: Window, Level, Zoom, Rotation and Series Scroll.
Zoom
Zoom interpolation is the process of creating new pixels between existing pixels in an image when it is zoomed in or out.
- The Nearest neighbor interpolation is the simplest method. Basically, it extends the pixel value.
- The Bilinear method averages the values of the four nearest existing pixels to the new pixel. This produces slightly sharper results than nearest-neighbor interpolation, but it is also slightly slower.
- The Bicubic method is similar to bilinear interpolation, but it uses a 16-point kernel instead of a 4-point kernel. This produces even sharper results than bilinear interpolation, but it is also the slowest method.
- The Lanczos method uses a sinc kernel to resample the image producing the sharpest results. It is moderately fast, between bilinear and bicubic.
The default value is Bilinear. The Nearest neighbor interpolation is faster but produces aliasing artifacts.
Other
- Apply Window/Level on color images: When checked, the window/level is applied on the RGB channels of the image. Otherwise, the window/level has no effect when unchecked.
- Inverse level direction: When checked, the level direction with mouse actions is inverted (dragging down will increase the brightness) according to the Basic Image Review profile. Otherwise, dragging down will decrease the brightness when unchecked.
- Apply by default the most recent Presentation State: When checked, the most recent Presentation State Object is applied on the related image. Otherwise, it is required to select it from .
- Overlay color: change the color and the opacity of DICOM overlay. The default color is white. The opacity can be changed from the transparency or alpha slider of the different color models in the color picker.