DICOM Export
How to export DICOM files
Weasis offers two complementary export workflows:
- Export the selected view — produces a raster image (PNG, TIFF, JPG, JPEG 2000) or a clipboard copy of what is currently shown on screen. Useful for slides, reports, e-mails, screenshots of measurements, and other non-DICOM consumers.
- DICOM Export — produces DICOM-format output (a directory tree, an ISO image, or a network transfer to a remote node). Use this to share studies with another DICOM-capable system without losing pixel fidelity or metadata.
Exporting the selected view
Open the export-view dialog from the toolbar icon or from the main menu File > Export > Exporting view. The output can be sent to the clipboard or saved to an image file in PNG, TIFF, JPG, or JPEG 2000 format.
Current view
Exports the view exactly as it appears on screen, at its current size and with every overlay (annotations, measurements, DICOM annotations, rulers…) visible.
Anonymize — removes identifying information from the overlay, in line with the Anonymize option of the 2D viewer.
Original Image
Exports the underlying image — without on-screen overlays — with a few rendering options.
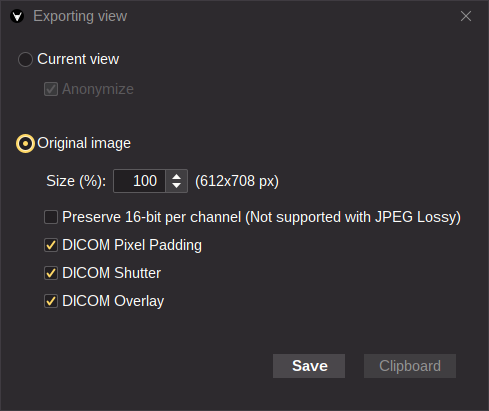
- Size — scale the exported image (percentage of the original dimensions).
- Preserve 16-bit per channel — keep the original pixel depth (16-bit in PNG / JPEG 2000 / JPEG-XL / TIFF, double values in TIFF). When checked, the exported pixel values match the Modality LUT values (e.g. Hounsfield units for CT). JPEG Lossy is only available with this option unchecked, since the format requires an 8-bit image.
- DICOM Pixel Padding — apply the DICOM pixel padding when checked.
- DICOM Shutter — apply the DICOM shutters when checked.
- DICOM Overlay — apply the DICOM overlays when checked.
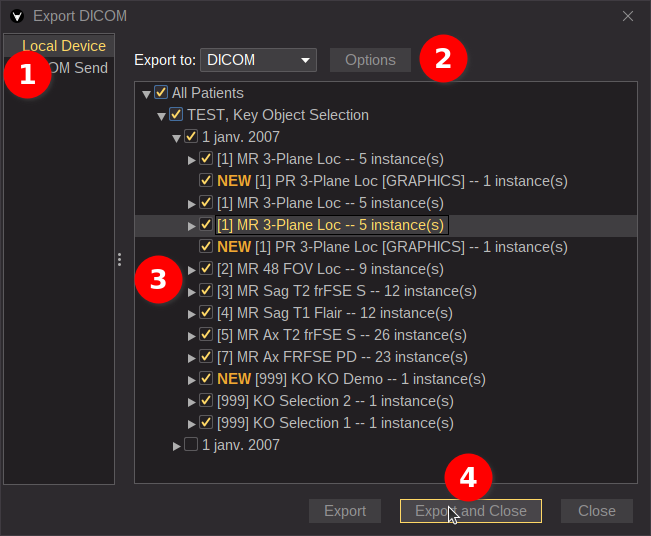
DICOM Export
Open the DICOM Export window from the toolbar icon or from the main menu File > Export > DICOM. Three destinations are available in the left panel — Local Device, DICOM Send, and CD/DVD Image — each with its own set of options.
Tip
When the export window opens, the study that was selected in the viewer (orange focus border) is pre-checked, and the series that are currently open are highlighted with a full-line selection.
Hover any series row to see its thumbnail in a tooltip — useful when picking among several similar series.
Local Device
- Select Local Device.
- Choose the export options:
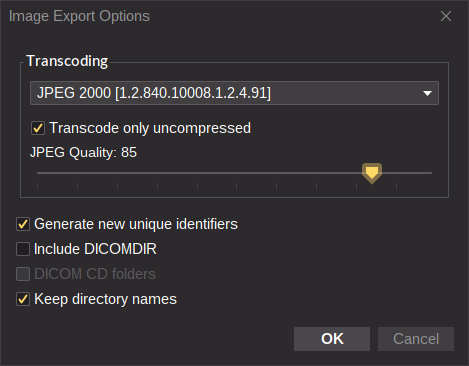
- Transcoding — change the DICOM transfer syntax (compression / encoding) of the exported files. Leave the default unless you specifically need a different syntax.
- Generate new unique identifiers — replace the Study / Series / SOP Instance UIDs with newly generated ones. Cross-references between UIDs are kept consistent within this export session only — running the export a second time produces a different set of UIDs that no longer matches the first.
- Include DICOMDIR — write a DICOMDIR index file alongside the exported objects.
- DICOM CD folders — wrap the exported tree in the standard DICOMDIR-compliant folder layout used on DICOM CDs.
- Keep directory names — preserve human-readable folder names in the exported hierarchy (incompatible with the strict DICOMDIR layout).
- Pick the patient(s), study (or studies), series, or individual instances to export. Series created inside Weasis (such as Key Object / Presentation State objects) are marked with a NEW flag.
- Click Export to write the files, then close the window.
Note
When the export uses a native image format (JPG, PNG, JPEG 2000, JPEG-XL, or TIFF) instead of DICOM, only the image frames are converted (see the Original Image options). Encapsulated DICOM payloads — video, audio, and PDF — are extracted as standalone files in their native format.
Multi-frame images are exported as numbered files (one frame per file).
DICOM Send
Sends the selected objects directly to a remote DICOM or DICOMweb node over the network — the same protocols used by PACS systems for inter-institutional transfer.
- Select DICOM Send.
- Choose the destination node — a classic DICOM node (C-STORE) or a DICOMweb node (STOW-RS).
- Pick the patient(s) / study / series / instances to send. Series created inside Weasis are marked with a NEW flag.
- Click Send to transfer, then close the window.
Tip
Destination nodes are configured under File > Preferences > DICOM (see the DICOM Node List and DICOMweb Node List entries) and can be reused across export sessions.
CD/DVD Image
Produces a burnable ISO image that follows the DICOMDIR layout expected by most CD/DVD-based DICOM media.
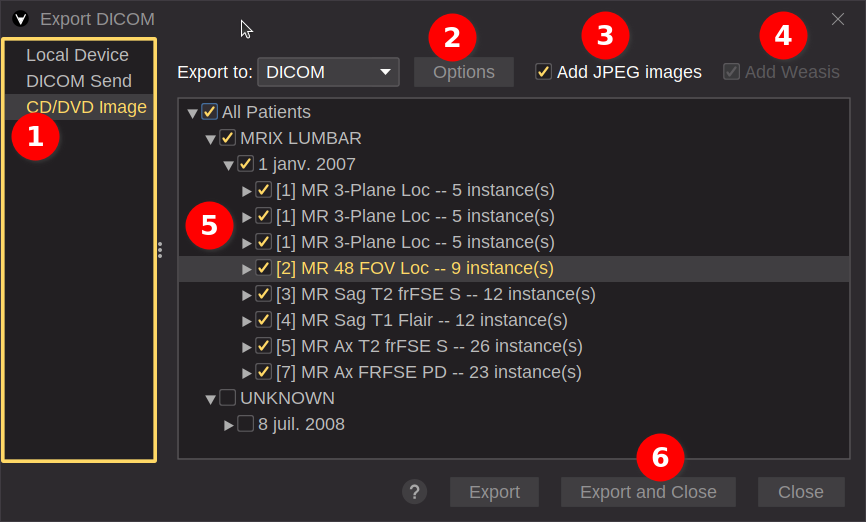
- Select CD/DVD Image.
- Choose the export options:
- Transcoding — change the DICOM transfer syntax of the exported files. Leave the default unless you specifically need a different syntax.
- Generate new unique identifiers — replace the Study / Series / SOP Instance UIDs with newly generated ones. Cross-references between UIDs are kept consistent within this export session only — running the export a second time produces a different set of UIDs that no longer matches the first.
- Add JPEG images — also extract every image and every encapsulated payload (video, audio, PDF) into a separate JPEG folder for easy preview on systems without a DICOM viewer.
- Add Weasis — embed the Weasis viewer directly into the ISO so the recipient can launch it from the media. Currently supported only on Windows x86-64 (both for producing and for running the embedded copy). Running Weasis straight off a CD/DVD is slow; for a better experience, write the ISO to a USB stick or open the disc with a locally installed copy of Weasis as described in the
README.htmlon the disc. - Pick the patient(s) / study / series / instances to export.
- Click Export to write the ISO, then close the window.