View Synchronization
One action propagated across several views
View synchronization propagates the same actions (scroll, zoom, window / level, …) across several views at once. Weasis offers two synchronization modes — an automatic mode driven by shared DICOM geometry (the Frame of Reference UID, abbreviated FoR throughout this page) and a manual mode to bridge views that the automatic mode cannot connect (only for scrolling).
Frame of Reference: the shared coordinate system
Two series carry the same Frame of Reference UID (DICOM tag 0020,0052) when they were acquired in the same 3D coordinate system. In practice, sharing the same Frame of Reference means sharing the same 3D coordinate system: every voxel in those series is positioned against the same origin and the same axes, so the point at coordinates (x, y, z) refers to the exact same physical location in all of them.
Acquisitions performed in the same session without moving the patient typically share a Frame of Reference, for example:
- the CT and the PET produced together by a hybrid PET / CT scanner,
- all the slices of a single MR sequence,
- a planning CT and the RTSTRUCT / RTPLAN / RTDOSE objects derived from it.
This shared geometry is what makes automatic synchronization possible: when Weasis sees the same FoR on two views, it can align them in 3D without any manual configuration. Series acquired in separate sessions, on different scanners, or after the patient has moved typically have different Frames of Reference and must be coupled with manual sync instead.
The Frame of Reference is the linking concept used by:
- Auto-synchronization (see Default Stack Mode below) — propagates scroll, zoom, window/level, … between views sharing a FoR.
- The 3D cursor (crosshair) — clicks on one view jump to the same anatomical point in every other view sharing the same FoR.
- The MPR viewer — the three reconstruction planes are always FoR-coupled by the crosshair.
Synchronization Modes
The synchronization mode is controlled by the drop-down button next to the layout button in the toolbar.
| Mode | Description |
|---|---|
| Default Stack | Couples views from different series that share the same Frame of Reference UID. Scroll only is propagated by default; every other per-action toggle (Pan, Zoom, W/L, Rotation, Flip, …) is opt-in. This is the default mode. |
| Default Tile | Lays out consecutive images of the same series in a mosaic (n, n+1, n+2, …). Every per-action setting is propagated by default so the whole tile group behaves as a single coherent display. |
The drop-down popup also contains:
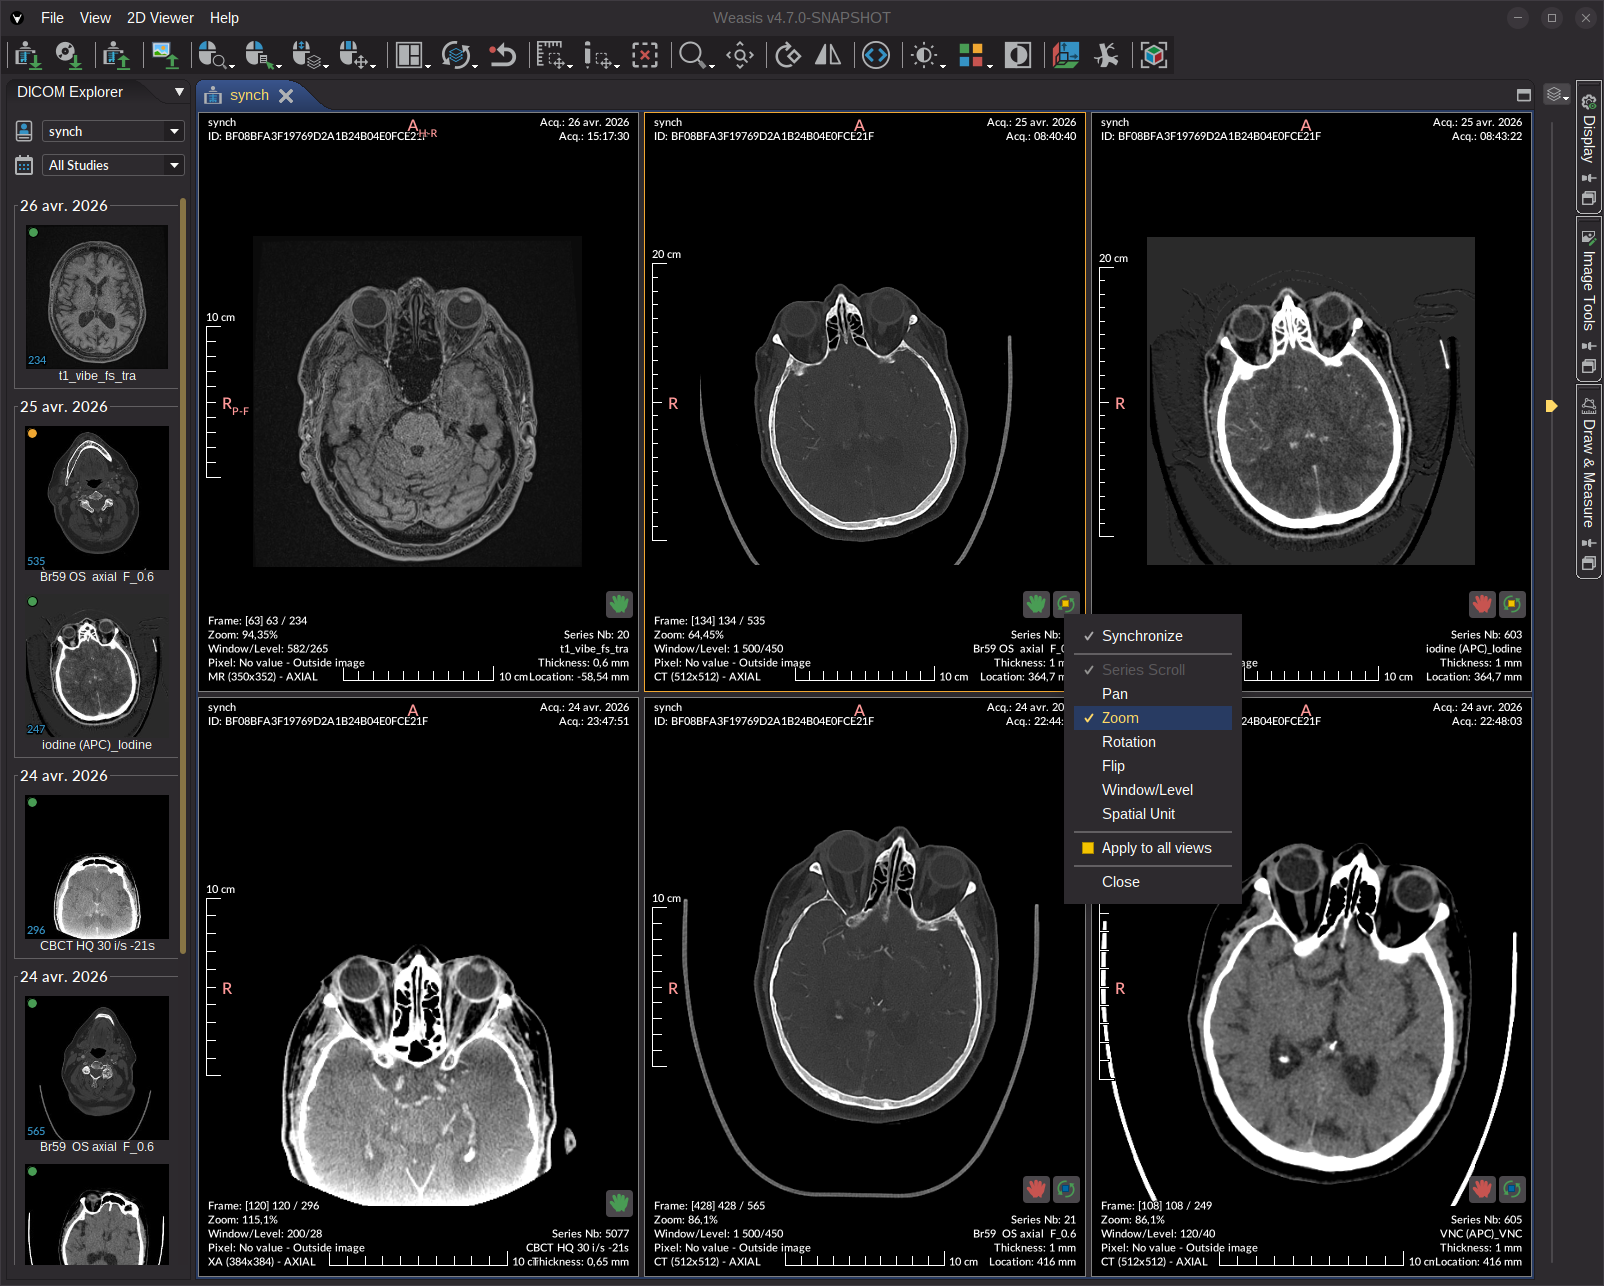
- A non-interactive series-name header at the top of the popup, identifying the currently selected view. It makes explicit that the per-action toggles and the Apply to all views entry below reflect this specific view’s synchronization options.
- A master Synchronize checkbox — a global switch that turns synchronization on or off for the whole synchronization session (every participating view, including auto-synced views in other linked containers) without changing the active mode. This is broader than the per-view button, which toggles only the single view it sits on. Unchecking it makes every view fully independent. See Synchronization scope for how the scopes interact.
- Per-action toggles (Scroll, Pan, Zoom, Rotation, Flip, Window / Level, Spatial unit) mirroring the selected view’s configuration.
- An Apply to all views entry — decorated with the selected view’s FoR color chip — that propagates the configuration to every other sync-active view in the container, regardless of FoR (broader than the same-named entry in the per-view popup, which is restricted to the selected view’s FoR group). See Per-view sync controls for the per-action semantics and the color-chip system.
The synchronization mode can also be set programmatically with the command:
where VALUE is Stack or Tile. See Commands for details.
Synchronization Scope
Synchronization operates at three different scopes. Knowing which is which avoids surprises when more than one viewer window is open:
- Global (whole session) — the master Synchronize checkbox in the toolbar drop-down is a global switch: it enables or disables synchronization for every participating view at once, not just the selected view.
- Across containers (auto-sync) — Default Stack auto-synchronization is not limited to a single container. Views in any other visible container that belongs to the same group (the windows opened together from one patient/study group) and is also in Stack mode are kept in sync as well. Open the same study in two windows and scroll, Window / Level, etc. stay coupled across both.
- Within one container (manual sync) since v4.7.0 — manual sync only links views that live in the same container window; you cannot manually link a view to one in another container. In addition, only one manual-sync session can be active at a time across the whole application — starting manual sync on another eligible view joins the existing session rather than creating a second, independent group.
Default Stack Mode (Auto Synchronization)
Default Stack is the most common synchronization mode. When two or more series share the same Frame of Reference UID, Weasis can synchronize their views automatically.
By default, only Scroll is propagated — navigating to a slice in one view moves the other views to the closest matching anatomical position. Every other action (Pan, Zoom, Rotation, Flip, Window / Level, Spatial unit) starts disabled, and you opt them in explicitly through the per-action toggles in either:
- the toolbar drop-down popup (applies to the selected view; use Apply to all views to propagate the change to its FoR group), or
- the per-view auto-sync popup opened from the button on the view itself.
See Per-view sync controls for the full list of toggles and the FoR color-chip system.
Typical use case: display a CT series and its corresponding PET series side by side. Because both series share the same Frame of Reference UID, scrolling through slices in the CT view automatically scrolls the PET view to the matching anatomical level. To couple Window / Level or Zoom too, enable the action on every view in the group (an action is synced only between views that both have it enabled) — toggle it on one view and use Apply to all views.
To find which series share the same Frame of Reference, right-click a thumbnail in the DICOM Explorer and choose Select related Series, then open all the selected series together in the 2D viewer.
The screenshot illustrates how Weasis advertises synchronization groups visually inside a single layout:
- The two views in the left column carry no Frame of Reference UID. Because they are not eligible for auto-sync, the auto-sync button is not shown on them at all — only the manual-sync button is available.
- The four views on the right form two pairs sharing a Frame of Reference UID, each pair tagged with its own auto-sync color chip: yellow for the top pair, blue for the bottom pair. Auto-sync is propagated only within a same-colored group.
- A manual-sync link (hand icon, in green when active) couples one of the FoR-less left views to two peers at once — the other FoR-less view and a view that belongs to one of the FoR pairs — illustrating that manual sync is the fallback to bridge views that auto-sync cannot connect, regardless of whether the peer has a FoR or not.
Per-view Sync Controls
In addition to the global toolbar drop-down, each 2D view carries small overlay buttons in the bottom-right corner that drive its sync behavior independently since v4.7.0. They appear whenever the view has at least one eligible peer for synchronization.
Auto-sync button
The button toggles Default Stack auto-synchronization for this view only. Its appearance encodes two pieces of information:
- Outer tint — red when auto-sync is OFF for the view, green when ON.
- Center color chip — a small colored square shown when the container holds two or more views with different Frame of Reference UIDs. The color identifies the FoR group; views sharing the same UID share the same chip color, so groupings are visible at a glance. When the container has only one FoR (nothing to disambiguate), the chip is hidden.
Clicking the button opens a per-view sync popup with:
- Synchronize this view — master on/off toggle for auto-sync on this view (closes the popup on click).
- Per-action toggles — independent checkboxes for Scroll, Pan, Zoom, Rotation, Flip, Window / Level, and Spatial unit. The popup stays open while you flip several options, so you can configure the whole set in one pass.
- Apply to all views — copies this view’s effective sync options to every other view sharing the same Frame of Reference UID. The item is decorated with the view’s FoR color chip, matching the chip drawn on the auto-sync button so you can confirm at a glance which group will be affected.
- Close — explicit dismiss (the per-action toggles do not auto-close on click; Esc and clicks outside also dismiss the popup as usual).
A per-action toggle only declares whether this view takes part in syncing that action. An action is propagated between two views only when both of them have it enabled — sharing the same Frame of Reference UID is not enough on its own. Enabling Zoom on a single view therefore has no visible effect until at least one peer also has Zoom enabled. To couple an action across a whole FoR group in one step, enable it on one view and use Apply to all views.
Manual sync button
Some series cannot be auto-synced because they have no — or a different — Frame of Reference UID (typical for unrelated CT scans, or legacy series with missing DICOM geometry). The manual-sync button (same bottom-right corner) lets you link such a view to a peer by relative slice index instead of 3D position.
A view is an eligible candidate for manual sync with the current view when it lives in the same container, has the same orientation, and a different (or absent) FoR — manual sync never crosses containers, and only one manual-sync session can be active across the whole application (see Synchronization scope). Clicking the button on a view that is currently OFF picks the link target according to how many candidates exist:
- A manual-sync group already exists in the container — the new view joins it directly (bidirectional links are added to every member). No picker is shown.
- Exactly one candidate — the link is established immediately, no picker.
- Multiple candidates and no existing group — a multi-select picker opens so you can pick the views to sync with.
Once active:
- Scroll propagation is forced on and locked in the per-view sync popup — manual sync is built on top of scroll. All other per-action toggles (Pan, Zoom, W / L, …) remain freely configurable.
- The manual-sync button turns green to indicate that a manual link is established. Clicking it again removes this view from the group.
The auto-sync and manual-sync buttons coexist on the same view. Auto-sync is preferred whenever a shared FoR is available; manual sync is the fallback for views that fall outside any spatial group.
Default Tile Mode
Default Tile mode fills all views in the current layout with consecutive images from the same series. It is useful for reviewing a series at a glance, comparing adjacent slices, or preparing a print layout with multiple images per page.
When this mode is active:
- Each view shows a different image of the same series (n, n+1, n+2, …).
- Scroll advances the entire tile group by one image at a time.
- Every other per-action setting is enabled by default, both user-toggleable (Pan, Zoom, Rotation, Flip, Window / Level, Spatial unit) and always-on internal (Preset, LUT, LUT shape, Invert LUT, Filter, Inverse stack, Sort stack), so the tile group behaves as a single coherent display.
Use the per-action toggles to disable any user-toggleable setting if you want tiles to diverge (e.g. independent zoom for cropped previews).
Typical use case: print or export a multi-image layout where each cell shows a different slice of the same series. See Print for more details.
This is the opposite default from Default Stack, where only Scroll propagates and every other action starts off. Tile mode assumes you want everything in lock-step (same series, multi-cell view); Stack mode assumes you want surgical control (different series, cross-modality comparison).
3D Cursor Synchronization
The 3D cursor (crosshair) is a dedicated synchronization mechanism that links the cursor position in 3D space across views that share the same Frame of Reference UID.
Unlike stack mode, which only aligns views near the same anatomical depth, the crosshair lets you click precisely in one view and see that exact 3D point highlighted in every other view simultaneously — regardless of slice or plane orientation.
See the 3D cursor tutorial for full details.
MPR Synchronization
Two distinct couplings are at play in the MPR viewer:
Internal — between the three MPR planes (axial, coronal, sagittal): these are always cross-synchronized by the crosshair. Beyond that structural coupling, the MPR viewer uses different per-action defaults from the 2D viewer: Scroll, Zoom, and Window / Level are ON by default. The remaining per-action propagations (Pan, Rotation, Flip, Spatial unit) are off by default and can be enabled explicitly.
External — between MPR and other 2D views sharing the same Frame of Reference: the standard Default Stack rules apply (Scroll on by default; every other action opt-in via the per-view toggles described below).
In both cases, the per-view toggles are reached through the Synchronize submenu of each MPR view’s settings popup (see below) — the crosshair coupling itself cannot be disabled.
Per-view sync options in the MPR
MPR views do not show the auto-sync / manual-sync overlay buttons described in Per-view sync controls — synchronization between MPR planes is structural (driven by the crosshair) and cannot be turned off per view. Instead, the per-view sync configuration is reached through a Synchronize submenu in the MPR configuration popup (settings icon in the top-right corner of the view — listed alongside the other MPR settings).
The submenu is the same as the one opened by the auto-sync button on a regular 2D view, minus the master “Synchronize” toggle (you cannot disable synchronization for a single MPR plane — see above). It contains:
- Per-action toggles for Scroll, Pan, Zoom, Rotation, Flip, Window / Level, and Spatial unit. The submenu stays open while you flip several options.
- Apply to all views — propagates the current selection to every other view sharing the same Frame of Reference UID. Decorated with the FoR color chip identifying the target group.
- Close — closes the popup.
When manual synchronization is active on the view, Scroll is forced on and locked — manual sync is built on top of scroll propagation.
Cine and Synchronization
When the cine animation is active on a series, every series currently synchronized with it (via Default Stack or Default Tile) is animated as well. Cine remains active across series until the Cine stop button is clicked.